-
Clone git repository
git clone https://github.com/yimjiajun/.dotfiles.git ~/.dotfiles -
Run
install.shto start install 1~/.dotfiles/install.sh
this will installed when called
~/.dotfiles/install.shor~/.dotfiles/install.sh --app)
$USER
| Name | Description | |
|---|---|---|
| 1 | Manager | Invokes installed tools |
| 2 | System | Indicates and Control system information |
| 3 | Network | Indicates and Control device Network |
| 4 | Memory | Indicates device disk usage |
| Name | Description | |
|---|---|---|
| 1 | bpytop | Linux/OSX/FreeBSD resource monitor |
| 2 | buku | Personal mini-web in text |
| 3 | clangd | clangd understands your C++ code and adds smart features to your editor |
| 4 | cron | command-line utility is a job scheduler on Unix-like operating systems |
| 5 | ctags | generates an index (or tag) file of language objects found in source files for programming languages |
| 6 | curl | command lines or scripts to transfer data |
| 7 | fzf | A command-line fuzzy finder |
| 8 | git | distributed version control system designed to handle everything from small to very large projects with speed and efficiency. |
| 9 | gpg | GnuPG allows you to encrypt and sign your data and communications |
| 10 | htop | cross-platform interactive process viewer |
| 11 | khal | standards based CLI and terminal calendar program, able to synchronize with CalDAV servers through vdirsyncer. |
| 12 | lazygit | simple terminal UI for git commands |
| 13 | mdbook | Create book from markdown files. Like Gitbook but implemented in Rust |
| 14 | ncdu | disk usage analyzer with an ncurses interface. |
| 15 | notify-send | a program to send desktop notifications |
| 16 | pass | each password lives inside of a gpg encrypted file whose filename is the title of the website or resource that requires the password |
| 17 | picocom | Minimal dumb-terminal emulation program |
| 18 | ranger | A VIM-inspired filemanager for the console |
| 19 | ripgrep | About ripgrep recursively searches directories for a regex pattern while respecting your gitignore |
| 20 | rust | Empowering everyone to build reliable and efficient software. |
| 21 | ssh | cryptographic network protocol for operating network services securely over an unsecured network |
| 22 | tar | create Archive and extract the Archive files. |
| 23 | tmux | Terminal multiplexer. It lets you switch easily between several programs in one terminal |
| 24 | usbipd | Windows software for sharing locally connected USB devices to other machines, including Hyper-V guests and WSL 2. |
| 25 | wireless-tools | Collection of user-space utilities written for Linux kernel-based operating systems to support and facilitate the configuration of device drivers of wireless network interface controllers |
| 26 | xdg-utils | Utilities for integrating applications with the desktop environment, regardless of which desktop environment is used |
| Name | Description | |
|---|---|---|
| 1 | zephyr | small-footprint kernel designed for use on resource-constrained and embedded systems |
Vim is a highly configurable text editor built to make creating and changing any kind of text very efficient. It is included as "vi" with most UNIX systems and with Apple OS X.
.dotfiles Guide and Introduction
-
install specific project.
~/.dotfiles/install.sh --toolsor~/.dotfiles/install.sh --prj.~/.dotfiles/install.sh --helpfor more information ↩
Dotfiles
Bluetooth
Connect to a Bluetooth device via the terminal.
This process involves configuring our Bluetooth controller, pairing it to our target device.
reference: Connect to Bluetooth Device via the Terminal
- Interactive
- Controller
- Device
- Usage
Bluetooth - Interactive
Interactive Bluetooth control tools
bluetoothctl
Output response: Interactive shell
Agent registered
[bluetooth]#
Bluetooth - Controller Status
bluetoothctl show
Output response:
Powered: yes
Pairable: yes
discoverable: no
Discovering: no
Controller DC:41:A9:1F:E2:61 (public)
        Name: R
        Alias: R
        Class: 0x006c010c
        Powered: yes
        Discoverable: no
        DiscoverableTimeout: 0x000000b4
        Pairable: yes
        UUID: A/V Remote Control        (0000110e-0000-1000-8000-00805f9b34fb)
        UUID: Handsfree Audio Gateway   (0000111f-0000-1000-8000-00805f9b34fb)
        UUID: PnP Information           (00001200-0000-1000-8000-00805f9b34fb)
        UUID: Audio Sink                (0000110b-0000-1000-8000-00805f9b34fb)
        UUID: Headset                   (00001108-0000-1000-8000-00805f9b34fb)
        UUID: A/V Remote Control Target (0000110c-0000-1000-8000-00805f9b34fb)
        UUID: Generic Access Profile    (00001800-0000-1000-8000-00805f9b34fb)
        UUID: Audio Source              (0000110a-0000-1000-8000-00805f9b34fb)
        UUID: Generic Attribute Profile (00001801-0000-1000-8000-00805f9b34fb)
        UUID: Device Information        (0000180a-0000-1000-8000-00805f9b34fb)
        Modalias: usb:v1D6Bp0246d0540
        Discovering: no
        Roles: central
        Roles: peripheral
Advertising Features:
        ActiveInstances: 0x00 (0)
        SupportedInstances: 0x08 (8)
        SupportedIncludes: tx-power
        SupportedIncludes: appearance
        SupportedIncludes: local-name
        SupportedSecondaryChannels: 1M
        SupportedSecondaryChannels: 2M
        SupportedSecondaryChannels: Coded
Bluetooth - Multiple Controllers
When local device / computer supporting multiple Bluetooth controller, must ensure we select the correct one before connecting.
List of connected Bluetooth controllers
Reference: Using Multiple Bluetooth Controller
bluetoothctl list
Select a default controller
Select a Bluetooth controller by MAC address
For convenient, using controller name convert to MAC address:
read "Choose a name of default controller" dev_name
bluetoothctl select $(bluetoothctl list | grep "$dev_name" | awk '{ print $2 }')
Bluetooth - Controller Power On
Turn on Bluetooth controller, when powered is off ( Powered: no )
bluetoothctl power on
Output response: power on
Changing power on succeeded
Bluetooth - Discoverable Controller
Start discover by Bluetooth controller, when Discoverable is off (Discoverable: no)
bluetoothctl discoverable on
Output response: Discoverable: yes
Changing discoverable on succeeded
Bluetooth - Pairable Controller
Turn on controller to pairs, when controller is not pairable ( Pairable: no )
bluetoothctl pairable on
Output response: pairable
Changing pairable on succeeded
Bluetooth - Scan devices
Enter Discovery Mode
Start scan discovering Bluetooth device, enter Discovery Mode
bluetoothctl scan on
Press ctrl + z to keep scanning in background, when discovered the Bluetooth device
scanning should stop after paired Bluetooth device
Output response: start discovery
Discovery started

[CHG] Device 7A:CE:82:C3:C2:C8 RSSI: -63
[CHG] Device 39:EF:AD:84:E4:A4 RSSI: -75
[NEW] Device 10:2B:41:17:19:7D [TV] Samsung TU7000 55 TV
...
[NEW] Device F8:4E:17:A7:72:D1 WH-XB910N
[NEW] Device 45:D3:C5:29:AA:E8 45-D3-C5-29-AA-E8
...
Exit Dicovery Mode
We have keep scanning the Bluetooth device in background
bring the bluetoothctl scan to foreground
and stop it to exit Discovery Mode
fg
Press ctrl + c stop bluetoothctl scan
to exit Discovery Mode
Bluetooth - Lists scanned / discovered devices
List all been scan / discovered Bluetooth device by scan
bluetoothctl devices
Output response: available Bluetooth devices
...
Device 10:2B:41:17:19:7D [TV] Samsung TU7000 55 TV
...

Device F8:4E:17:A7:72:D1 WH-XB910N
...
Bluetooth - Pairs device
Pair a Bluetooth device by MAC address
For convenient, using device name convert to MAC address:
read -p "Enter Bluetooth Device name to pair" dev_name
bluetoothctl pair  $(bluetoothctl devices | grep "$dev_name" | awk '{ print $2 }')
Example: WH-XB910N
bluetoothctl pair $(bluetoothctl devices | grep 'WH-XB910N' | awk '{ print $2 }')
Output response: pairing successful
attempting to pair with f8:4e:17:a7:72:d1
[chg] device f8:4e:17:a7:72:d1 connected: yes
[chg] device f8:4e:17:a7:72:d1 uuids: 00000000-deca-fade-deca-deafdecacaff
[chg] device f8:4e:17:a7:72:d1 uuids: 00001108-0000-1000-8000-00805f9b34fb
[chg] device f8:4e:17:a7:72:d1 uuids: 0000110b-0000-1000-8000-00805f9b34fb
[chg] device f8:4e:17:a7:72:d1 uuids: 0000110c-0000-1000-8000-00805f9b34fb
[chg] device f8:4e:17:a7:72:d1 uuids: 0000110e-0000-1000-8000-00805f9b34fb
[chg] device f8:4e:17:a7:72:d1 uuids: 0000111e-0000-1000-8000-00805f9b34fb
[chg] device f8:4e:17:a7:72:d1 uuids: 00001200-0000-1000-8000-00805f9b34fb
[chg] device f8:4e:17:a7:72:d1 uuids: 764cbf0d-bbcb-438f-a8bb-6b92759d6053
[chg] device f8:4e:17:a7:72:d1 uuids: 81c2e72a-0591-443e-a1ff-05f988593351
[chg] device f8:4e:17:a7:72:d1 uuids: 8901dfa8-5c7e-4d8f-9f0c-c2b70683f5f0
[chg] device f8:4e:17:a7:72:d1 uuids: 931c7e8a-540f-4686-b798-e8df0a2ad9f7
[chg] device f8:4e:17:a7:72:d1 uuids: 956c7b26-d49a-4ba8-b03f-b17d393cb6e2
[chg] device f8:4e:17:a7:72:d1 uuids: df21fe2c-2515-4fdb-8886-f12c4d67927c
[chg] device f8:4e:17:a7:72:d1 uuids: f8d1fbe4-7966-4334-8024-ff96c9330e15
[chg] device f8:4e:17:a7:72:d1 servicesresolved: yes
[chg] device f8:4e:17:a7:72:d1 paired: yes
pairing successful
Bluetooth - Connects Paired Device
Connects a Bluetooth device by MAC address
For convenient, using device name convert to MAC address:
read -p "Enter Bluetooth Device name to connect" dev_name
bluetoothctl connect \
$(bluetoothctl devices | grep "$dev_name" | awk '{ print $2 }')
Example: WH-XB910N
bluetoothctl connect \
$(bluetoothctl devices | grep 'WH-XB910N' | awk '{ print $2 }')
Output response: Connection successful
Attempting to connect to F8:4E:17:A7:72:D1
[CHG] Device 4A:1D:1F:45:53:18 ManufacturerData Key: 0x004c
[CHG] Device 4A:1D:1F:45:53:18 ManufacturerData Value:
  0f 05 80 35 02 04 9c 10 03 73 0d 18              ...5.....s..
[NEW] Device 72:FC:FF:53:FA:3F 72-FC-FF-53-FA-3F
[CHG] Device A8:51:AB:0F:FB:6F RSSI: -65
[NEW] Device 5A:83:EF:6B:7B:6C 5A-83-EF-6B-7B-6C
[CHG] Device 10:2B:41:17:19:7D ManufacturerData Key: 0xff19
[CHG] Device 10:2B:41:17:19:7D ManufacturerData Value:
  00 75 00 09 01 00 00 00 06 01 00 00 00 00 00 00  .u..............
  00 00 00 00 00 00 00 00                          ........
[CHG] Device 10:2B:41:17:19:7D ManufacturerData Key: 0x0075
[CHG] Device 10:2B:41:17:19:7D ManufacturerData Value:
  42 04 01 20 67 21 0d 00 02 01 37 01 01 00 01 00  B.. g!....7.....
  00 00 00 00 00 00 00 0e                          ........
[CHG] Device 65:2C:86:67:CB:87 RSSI: -78
[NEW] Device 64:87:14:42:D7:F0 64-87-14-42-D7-F0
[CHG] Device F8:4E:17:A7:72:D1 Connected: yes
Connection successful
Bluetooth - Connection
- Initialization
- Discover Bluetooth Controller
- Connect to Bluetooth Device
- Connect to paired Bluetooth device
- Multiple Bluetooth Controller
Initialization
Interactive with bluetoothd daemon
bluetoothctl
Output response: Interactive shell
Agent registered
[bluetooth]#
Show available Bluetooth controller(s)
bluetoothctl show
Output response:
Powered: yes
Pairable: yes
discoverable: no
Discovering: no
Controller DC:41:A9:1F:E2:61 (public)
        Name: R
        Alias: R
        Class: 0x006c010c
        Powered: yes
        Discoverable: no
        DiscoverableTimeout: 0x000000b4
        Pairable: yes
        UUID: A/V Remote Control        (0000110e-0000-1000-8000-00805f9b34fb)
        UUID: Handsfree Audio Gateway   (0000111f-0000-1000-8000-00805f9b34fb)
        UUID: PnP Information           (00001200-0000-1000-8000-00805f9b34fb)
        UUID: Audio Sink                (0000110b-0000-1000-8000-00805f9b34fb)
        UUID: Headset                   (00001108-0000-1000-8000-00805f9b34fb)
        UUID: A/V Remote Control Target (0000110c-0000-1000-8000-00805f9b34fb)
        UUID: Generic Access Profile    (00001800-0000-1000-8000-00805f9b34fb)
        UUID: Audio Source              (0000110a-0000-1000-8000-00805f9b34fb)
        UUID: Generic Attribute Profile (00001801-0000-1000-8000-00805f9b34fb)
        UUID: Device Information        (0000180a-0000-1000-8000-00805f9b34fb)
        Modalias: usb:v1D6Bp0246d0540
        Discovering: no
        Roles: central
        Roles: peripheral
Advertising Features:
        ActiveInstances: 0x00 (0)
        SupportedInstances: 0x08 (8)
        SupportedIncludes: tx-power
        SupportedIncludes: appearance
        SupportedIncludes: local-name
        SupportedSecondaryChannels: 1M
        SupportedSecondaryChannels: 2M
        SupportedSecondaryChannels: Coded
Power on Bluetooth controller
Turn on Bluetooth controller, when powered is off ( Powered: no )
bluetoothctl power on
Output response: power on
Changing power on succeeded
Discover Bluetooth Controller
Start discover by Bluetooth controller, when Discoverable is off ( Discoverable: no )
bluetoothctl discoverable on
Output response: Discoverable: yes
Changing discoverable on succeeded
Enable controller to pairable
Turn on controller to pairs, when controller is not pairable ( Pairable: no )
bluetoothctl pairable on
Output response: pairable
Changing pairable on succeeded
Discovery Bluetooth Device
Discovery Mode
Scan discovering device
Start scan discovering Bluetooth device, enter Discovery Mode
bluetoothctl scan on
Press ctrl + z to keep scanning in background (stop after pair), when discovered the Bluetooth device
scanning should stop after paired Bluetooth device
Output response: start discovery
Discovery started

[CHG] Device 7A:CE:82:C3:C2:C8 RSSI: -63
[CHG] Device 39:EF:AD:84:E4:A4 RSSI: -75
[NEW] Device 10:2B:41:17:19:7D [TV] Samsung TU7000 55 TV
...
[NEW] Device F8:4E:17:A7:72:D1 WH-XB910N
[NEW] Device 45:D3:C5:29:AA:E8 45-D3-C5-29-AA-E8
...
List all scanned Bluetooth devices
List all been scan / discovered Bluetooth device by scan
bluetoothctl devices
Output response: available Bluetooth devices
...
Device 10:2B:41:17:19:7D [TV] Samsung TU7000 55 TV
...

Device F8:4E:17:A7:72:D1 WH-XB910N
...
Connect to Bluetooth Device
Pairing Bluetooth device
Pair a Bluetooth device by MAC address
For convenient, using device name convert to MAC address:
read -p "Enter Bluetooth Device name to pair" dev_name
bluetoothctl pair  $(bluetoothctl devices | grep "$dev_name" | awk '{ print $2 }')
Example: WH-XB910N
bluetoothctl pair $(bluetoothctl devices | grep 'WH-XB910N' | awk '{ print $2 }')
Output response: pairing successful
attempting to pair with f8:4e:17:a7:72:d1
[chg] device f8:4e:17:a7:72:d1 connected: yes
[chg] device f8:4e:17:a7:72:d1 uuids: 00000000-deca-fade-deca-deafdecacaff
[chg] device f8:4e:17:a7:72:d1 uuids: 00001108-0000-1000-8000-00805f9b34fb
[chg] device f8:4e:17:a7:72:d1 uuids: 0000110b-0000-1000-8000-00805f9b34fb
[chg] device f8:4e:17:a7:72:d1 uuids: 0000110c-0000-1000-8000-00805f9b34fb
[chg] device f8:4e:17:a7:72:d1 uuids: 0000110e-0000-1000-8000-00805f9b34fb
[chg] device f8:4e:17:a7:72:d1 uuids: 0000111e-0000-1000-8000-00805f9b34fb
[chg] device f8:4e:17:a7:72:d1 uuids: 00001200-0000-1000-8000-00805f9b34fb
[chg] device f8:4e:17:a7:72:d1 uuids: 764cbf0d-bbcb-438f-a8bb-6b92759d6053
[chg] device f8:4e:17:a7:72:d1 uuids: 81c2e72a-0591-443e-a1ff-05f988593351
[chg] device f8:4e:17:a7:72:d1 uuids: 8901dfa8-5c7e-4d8f-9f0c-c2b70683f5f0
[chg] device f8:4e:17:a7:72:d1 uuids: 931c7e8a-540f-4686-b798-e8df0a2ad9f7
[chg] device f8:4e:17:a7:72:d1 uuids: 956c7b26-d49a-4ba8-b03f-b17d393cb6e2
[chg] device f8:4e:17:a7:72:d1 uuids: df21fe2c-2515-4fdb-8886-f12c4d67927c
[chg] device f8:4e:17:a7:72:d1 uuids: f8d1fbe4-7966-4334-8024-ff96c9330e15
[chg] device f8:4e:17:a7:72:d1 servicesresolved: yes
[chg] device f8:4e:17:a7:72:d1 paired: yes
pairing successful
Stop Scanning
We have keep scanning the Bluetooth device in background,
bring the bluetoothctl scan to foreground
and stop it to exit Discovery Mode
fg
Press ctrl + c stop bluetoothctl scan
to exit Discovery Mode
Connect to paired Bluetooth device
Connects a Bluetooth device by MAC address
For convenient, using device name convert to MAC address:
read -p "Enter Bluetooth Device name to connect" dev_name
bluetoothctl connect \
$(bluetoothctl devices | grep "$dev_name" | awk '{ print $2 }')
Example: WH-XB910N
bluetoothctl connect \
$(bluetoothctl devices | grep 'WH-XB910N' | awk '{ print $2 }')
Output response: Connection successful
Attempting to connect to F8:4E:17:A7:72:D1
[CHG] Device 4A:1D:1F:45:53:18 ManufacturerData Key: 0x004c
[CHG] Device 4A:1D:1F:45:53:18 ManufacturerData Value:
  0f 05 80 35 02 04 9c 10 03 73 0d 18              ...5.....s..
[NEW] Device 72:FC:FF:53:FA:3F 72-FC-FF-53-FA-3F
[CHG] Device A8:51:AB:0F:FB:6F RSSI: -65
[NEW] Device 5A:83:EF:6B:7B:6C 5A-83-EF-6B-7B-6C
[CHG] Device 10:2B:41:17:19:7D ManufacturerData Key: 0xff19
[CHG] Device 10:2B:41:17:19:7D ManufacturerData Value:
  00 75 00 09 01 00 00 00 06 01 00 00 00 00 00 00  .u..............
  00 00 00 00 00 00 00 00                          ........
[CHG] Device 10:2B:41:17:19:7D ManufacturerData Key: 0x0075
[CHG] Device 10:2B:41:17:19:7D ManufacturerData Value:
  42 04 01 20 67 21 0d 00 02 01 37 01 01 00 01 00  B.. g!....7.....
  00 00 00 00 00 00 00 0e                          ........
[CHG] Device 65:2C:86:67:CB:87 RSSI: -78
[NEW] Device 64:87:14:42:D7:F0 64-87-14-42-D7-F0
[CHG] Device F8:4E:17:A7:72:D1 Connected: yes
Connection successful
Multiple Bluetooth Controller
When local device / computer supporting multiple Bluetooth controller, must ensure we select the correct one before connecting.
List of connected Bluetooth controllers
Reference: Using Multiple Bluetooth Controller
bluetoothctl list
Select a default controller
Select a Bluetooth controller by MAC address
For convenient, using controller name convert to MAC address:
read "Choose a name of default controller" dev_name
bluetoothctl select $(bluetoothctl list | grep "$dev_name" | awk '{ print $2 }')
cron
Execute scheduled commands
cron is daemon to execute scheduled commands
crontab is maintain crontab files for individual users
- crontab is the program used to install, deinstall or list the tables used to drive the cron(8) daemon
in Vixie Cron.
Each user can have their own crontab, and though these are files in /var/spool/cron/crontabs, they are not intended to be edited directly.
cron - Format
* * * * * <command>
| | | | |
| | | | +---- Day of the week (0 - 6) (Sunday to Saturday, 7 is also Sunday on some systems)
| | | +------ Month (1 - 12)
| | +-------- Day of the month (1 - 31)
| +---------- Hour (0 - 23)
+------------ Minute (0 - 59)
1. *: any or every value for specific time field
- example:
0****: every 1 hour (at minute 0)
2. */<num>: every specific time filed
- example:
**/2***: every 2 hours
3. Schedule command will not source .bashrc
ensure not using aliases or function defined in .bashrc
cron - Usage
crontab x default text editor
crontab -e
Benefit of using crontab with default editor
1. Syntax Validation
Checks the syntax of the crontab entries to ensure they are correctly formatted. This helps prevent mistakes that could lead to unintended consequences or errors.
2. File Locking
The crontab command handles file locking to ensure that multiple users cannot simultaneously edit the crontab file, reducing the risk of conflicts.
3. Reloads the Cron Daemon
When you update the crontab using the crontab command, it automatically notifies the cron daemon about the changes. This ensures that the new schedule takes effect immediately without needing to restart the cron daemon.
4. Permissions and Security
The crontab command performs permission checks to ensure that only authorized users can modify the crontab. This is crucial for system security.
Directly editing the crontab file manually using a text editor (without using crontab command) is discouraged and can lead to problems, such as syntax errors, file locking issues, or incorrect permissions. If you make mistakes in the crontab file, it could potentially cause cron jobs to fail or not execute as intended.
crontab x file
Schedule command maintain from provided file
crontab -u $USER <file>
cron - Lists scheduled command
crontab -l
cron - Delete
Delete user scheduled command
crontab -r $USER
cron - Files
/var/spool/cron/crontabs/
cron - Permissions
Limit the scheduled command to run
/etc/cron.allow
/etc/cron.deny
Dediprog
Founded in 2005 in Taiwan, DediProg has been the leading brand in providing IC programming devices and IC test sockets. They combine the efficiency of programming hardware with infrastructure software from a diversity of industry leaders to deliver a total IC programming solution for customers.

Dediprog - Linux Guide
Topic
| index | Section | |
|---|---|---|
| 1 | General Description | |
| 2 | Root Privileges | |
| 3 | USB Installation | |
| 4 | Source Code Compile | |
| 5 | Introduction | Basic Usages |
| Basic Switches | ||
| Miscellaneous Options |
I. General Description
DediProg have developed command line interface (DpCmd) especially for Linux operating system, which provide various command for the user's programming needs. This allows the user to have more flexibility in developing own software to call "DpCmd" thus add convenient IC programming.
II. Root Privileges
Root rights is required before each execution of "DpCmd", so DediProg
has provided a script (setup\_udev.sh) which the user needs to execute
as Root before executing the "DpCmd" for the first time, then "DpCmd"
can be executed directly.
III. USB Installation
Using Linux command to Installed USB driver.
Ubuntu: sudo apt-get install libusb-dev
Fedora/Centos: sudo yum install libusb-devel
IV. Source Code Compile
Download SF100Linux source code from https://github.com/DediProgSW/SF100Linux, and to compile code by "make". DpCmd execution file will be released.
V. Introduction
4.1 Basic Usages
1. dpcmd --r "f:\file.bin",
reads the chip and save it into a file "file.bin" in Partition f
2. dpcmd --r STDOUT --a 0x100 -l 0x23,
reads 0x23 bytes starting from 0x100 and display it on the screen
3. dpcmd --u f:\file.bin,
erases and then program file.bin in Partition f into the serial flash
4. dpcmd --p f:\file.bin --a 0x100,
writes file.bin in Partition f into the serial flash starting from address 0x100
5. dpcmd --p f:\file.bin --x 0xaa,
programs file.bin in Partition f into the serial flash and fill the rest area with 0xaa
Remarks: -a, -l only works with -p, -r, -s
Remarks: -x only works with -p
Remarks: space is not needed between the switches parameters. E.g. dpcmd --uf:\file.bin
4.2 Basic Switches
| Argument | Description |
|---|---|
| -? [ --help ] | show this help message |
| --list | print supported chip list |
| -d [ --detect ] | detect chip |
| -b [ --blank ] | blank check |
| -e [ --erase ] | erase entire chip |
| -r [ --read ] arg | read chip contents and save to a bin/hex/s19 file |
| -p [ --prog ] arg | program chip without erase |
| -u [ --auto ] arg | automatically run the following sequence: |
| - Read the memory content | |
| - Compare the memory content | |
| - Erase only the sectors with some differences | |
| - Program only the erased sectors with file data from address 0 | |
| -z [ --batch ] arg | automatically run the following sequence: |
| - check if the chip is blank or not; | |
| - erase the entire chip(if not blank); | |
| - program a whole file starting from address 0 | |
| -s [ --sum ] | display chip content checksum |
| -f [ --fsum ] arg | display the file checksum |
| - needs to work with a file | |
| --raw-instruction arg | issue raw serial flash instructions. |
| - needs to work with a file issue raw serial flash instructions. | |
| - use spaces(" ") to delimit bytes. | |
| - instructions must be enclosed in double quotation marks("") | |
| Example: | |
| dpcmd --raw-instruction "03 FF 00 12" | |
| --raw-require-return arg | decimal bytes of result to return in decimal after issuing raw instructions. |
| (=0) | |
| - used along with | |
| --raw-instruction only. | |
| Example: | |
| dpcmd --raw-instruction "03 FF 00 12" --raw-require-return |
4.3 Optional Switches that add fine-tune ability to Basic Switches:
| Argument | Description |
|---|---|
| -a [ --addr ] arg | hexadecimal starting address hexadecimal (e.g. 0x1000), |
| - works with | |
| --prog/read/sum/auto only | |
| - defaults to 0, if omitted. | |
| -l [ --length ] arg | hexadecimal length to read/program in bytes, |
| - works with | |
| --prog/read/sum/auto only | |
| - defaults to whole file if | |
| omitted | |
| -v [ --verify ] | verify checksum file and chip |
| - works with --prog/auto only | |
| -x [ --fill ] arg (=FF) | fill spare space with an hex value(e.g.FF), |
| - works with --prog, --auto only | |
| --type arg | Specify a type to override auto detection |
| - use --list arguement to look up supported type. | |
| --lock-start arg | hexadecimal starting address(e.g.0x1000), |
| - works with | |
| --prog/read/sum/auto only | |
| - defaults to 0, if omitted. | |
| --lock-length arg | hexadecimal length of area that will be kept unchanged while updating |
| - used along with --auto only. | |
| --blink arg | - 1: Blink the programmer connected to USB1 3 times. |
| --list-device-id arg | - 1: Prompt the device ID of programmer connected to USB1. |
4.4 Miscellaneous options
Note:
-
The programming operation always uses the default value for command.
If users want to use other setting, must add the wanted option to every command.
-t [ --timeout ] arg (=300)Timeout value in seconds
| Argument | Description |
|---|---|
| -g [ --target ] arg (=1) | Target Options |
| Available values: | |
| 1, Chip 1(Default) | |
| 2, Chip 2 | |
| 3, Socket | |
| 0, reference card | |
| --vcc arg (=0) | specify vcc |
| 0, 3.5V(Default) | |
| 1, 2.5V | |
| 2, 1.8V | |
| 1800 ~ 3800, 1.8 ~ 3.8V minimum step 100mV) (For SF600/SF600Plus only) | |
| --vpp | apply vpp when the memory chip supports it |
| - work with --prog and | |
| --erase. | |
| --log arg | Record the operation result in given/appointed .txt file |
| Example: | |
| ./dpcmd --log /tmp/log.txt | |
| Note: If user didn't use this command, the operation result will be recorded in "log.txt" | |
| -i [ --silent ] | supress the display of real-time timer counting |
| - used when integrating with 3rd-party tools(e.g. IDE) | |
| --spi-clk arg (=2) | specify SPI clock: |
| 2, 12 MHz(Default) | |
| 0, 24 MHz | |
| 1, 8 MHz | |
| 3, 3 MHz | |
| 4, 2.18 MHz | |
| 5, 1.5 MHz | |
| 6, 750 KHz | |
| 7, 375 KHz | |
| --set-io1 arg (=0) | specify Level of IO1(SF100) or GPIO1(SF600/SF600Plus): |
| 0, Low(Default) | |
| 1, High | |
| --set-io4 arg (=1) | specify Level of IO4(SF100) or GPIO2(SF600/SF600Plus): |
| 0, Low | |
| 1, High(Default) |
Drivers
Topic
Drivers - USB
USB - power
uhubctl - USB hub per-port power control
Installation
-
install uhubctl by package
sudo apt-get install uhubctl
Usage
-
Turn Off usb power
echo '1-1' | sudo tee /sys/bus/usb/drivers/usb/unbind -
Turn On usb power
echo '1-1' | sudo tee /sys/bus/usb/drivers/usb/bind
GPG
GnuPG is a complete and free implementation of the OpenPGP standard as defined by RFC4880 (also known as PGP).
GnuPG allows you to encrypt and sign your data and communications;
It features a versatile key management system, along with access modules for all kinds of public key directories.
GnuPG, also known as GPG, is a command line tool with features for easy integration with other applications.
Topic
| Sections | sub-sections | |
|---|---|---|
| 1 | Generate Key | |
| 2 | Lists Key | |
| 3 | Export Key | |
| 4 | Import Key |
GPG - Generate Keypairs
1. generate a gpg key
gpg --gen-key
gpg (GnuPG) 2.2.27; Copyright (C) 2021 Free Software Foundation, Inc.
This is free software: you are free to change and redistribute it.
There is NO WARRANTY, to the extent permitted by law.Note: Use "gpg --full-generate-key" for a full featured key generation dialog.
GnuPG needs to construct a user ID to identify your key.
2. Enter a real name
Real name: Richard Yim
3. Enter a email
Email address: RichardYim@ami.com
4. Confirm information
You selected this USER-ID:
    "Richard Yim <RichardYim@ami.com>"

Change (N)ame, (E)mail, or (O)kay/(Q)uit?
5. Enter the passphrase (make sure remembered)
passphrase is better with digit(s) or special-character(s)
┌──────────────────────────────────────────────────────┐
│ Please enter the passphrase to                       │
│ protect your new key                                 │
│                                                      │
│ Passphrase: ________________________________________ │
│                                                      │
│       <OK>                              <Cancel>     │
└──────────────────────────────────────────────────────┘
We need to generate a lot of random bytes. It is a good idea to perform
some other action (type on the keyboard, move the mouse, utilize the
disks) during the prime generation; this gives the random number
...
gpg: /home/jun/.gnupg/trustdb.gpg: trustdb created
...
public and secret key created and signed.pub rsa3072 2023-07-22 [SC] [expires: 2025-07-21]
(...pub key id here...)
uid Richard Yim richardyim@ami.com
sub rsa3072 2023-07-22 [E] [expires: 2025-07-21]
- id of key:
pub - expires date of key:
sub... [expires: 2025-07-21]
Modify expires date
1. Edit with public key ID
gpg --edit-key <id of pub key>
2. Insert expires in STDIN
gpg> expires
3. Select expires date
Changing expiration time for the primary key.
Please specify how long the key should be valid.
0 = key does not expire
= key expires in n days
w = key expires in n weeks
m = key expires in n months
y = key expires in n years
Key is valid for? (0)
GPG - Lists keypairs
Lists public keys
gpg -k
Lists secret keys (private key)
gpg -K
GPG - Export Key
1. Create a new folder for export key
cd $(mktemp -d)
2. Export public key with id (email)
gpg --output public.pgp --armor --export richardyim@ami.com
3. Export private key with id (email)
gpg --output private.pgp --armor --export-secret-key richardyim@ami.com
GPG - Import Key
1. Import private key
gpg --import private.pgp
2. Import public key
gpg --import public.pgp
3. Trust the key with id (email)
gpg --edit-key <id>
trust and Press Enter
gpg> trust
1 = I don't know or won't say
2 = I do NOT trust
3 = I trust marginally
4 = I trust fully
5 = I trust ultimately
m = back to the main menu
5 to trust the key ultimately
Your dicision? 5
y to confirm trust the key
Do you really want to set this key to ultimate trust? (y/N) y
save save the setting
gpg> save
Khal
Introduction
Khal is a standards based CLI and terminal calendar program, able to synchronize with CalDAV servers through vdirsyncer.
Khal - Usage
Topic
| sections | sub-sections | |
|---|---|---|
| 1 | Agenda | |
| 2 | Event Today | |
| 3 | New Event | single cli |
| interactive cli | ||
| 4 | Interactive |
Agenda
khal calendar
Event Today
khal list today
will indicate with tomorrow event if events available
New event
Single CLI
khal new
Interactive CLI
khal new -i
Interactive
khal interactive
or
ikhal
-
move to specific date and press Enter
-
press n to create new event
-
edit with normal keyboard without vi-mode
create/modify event keys (no vi-mode):
| keys | description |
|---|---|
| Tab | swap to next |
| Shift + Tab | swap to previous |
| Esc + Esc | to quit |
| Tab (s) | swap to > Save to save event |
Khal - at
Calendar Notification
at and batch read commands from standard input or a specified file which are to be executed at a later time, using /bin/sh
Topic
| sections | sub-sections | |
|---|---|---|
| 1 | Usage | Queue |
| 2 | Command | at |
| atrm | ||
| 3 | troubleshoot |
Usage
1. interactive provide instruction
at now + 1 hour
> here is interactive
> <Ctrl-D> to save and exit
2. direct provide instruction
at now + 1 hour <<< "notify-send 'hello-notification'"
Queue
at -q 'c' <<< echo "queue with single character only"
queue (-q)
- a: default for
at - b: batch.
- UPPER case: submitted to batch at the time of the job.
batch processing rules with respect to load average apply
Command
1. execute command at a later time
at <time>
2. execute command at a later time from now
count: numbertime-unit: minutes, hours, days, or weeks
at now + <count> <time-unit>
- example:
1. run script from /bin/sh after 1 minute
at now + 1minute <<< "echo \"run after a minute\" > /tmp/at_test.txt"
2. check pending job list
at -l
- or
atq
3. remove pending job list
at -r <job_number>
- or
atrm <job_number>
troubleshoot
1. Can't open /var/run/atd.pid to signal atd. No atd running?
sudo service atd start
Khal - vdirsyncer
Sync remote calendar
Vdirsyncer is a command-line tool for synchronizing calendars and addressbooks between a variety of servers and the local filesystem.
Topic
| sections | sub-sections | |
|---|---|---|
| 1 | Installation | |
| 2 | Google Calendar | APIs manager |
| Configuration |
Installation
1. Install synchronize with Remote/Cloud calendar
pip3 install --upgrade-strategy eager vdirsyncer
Google Calendar
Google API Manger
1. Create new project in Google API Manager
-
- Project Name: {NAME}-{NUMBER}
- Location: Optional
- Click Create

-
API and Service Home Page
-
Click + ENABLE APIS AND SERVICE

2. Enable CalDav API for google calendar API access
-
API Library homepage

-
Search CalDav API

-
Click to enable CalDav API

-
Success enable CalDav API
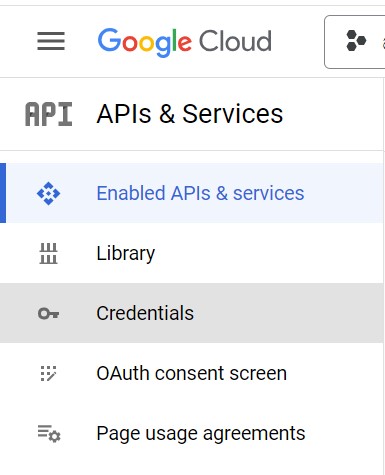
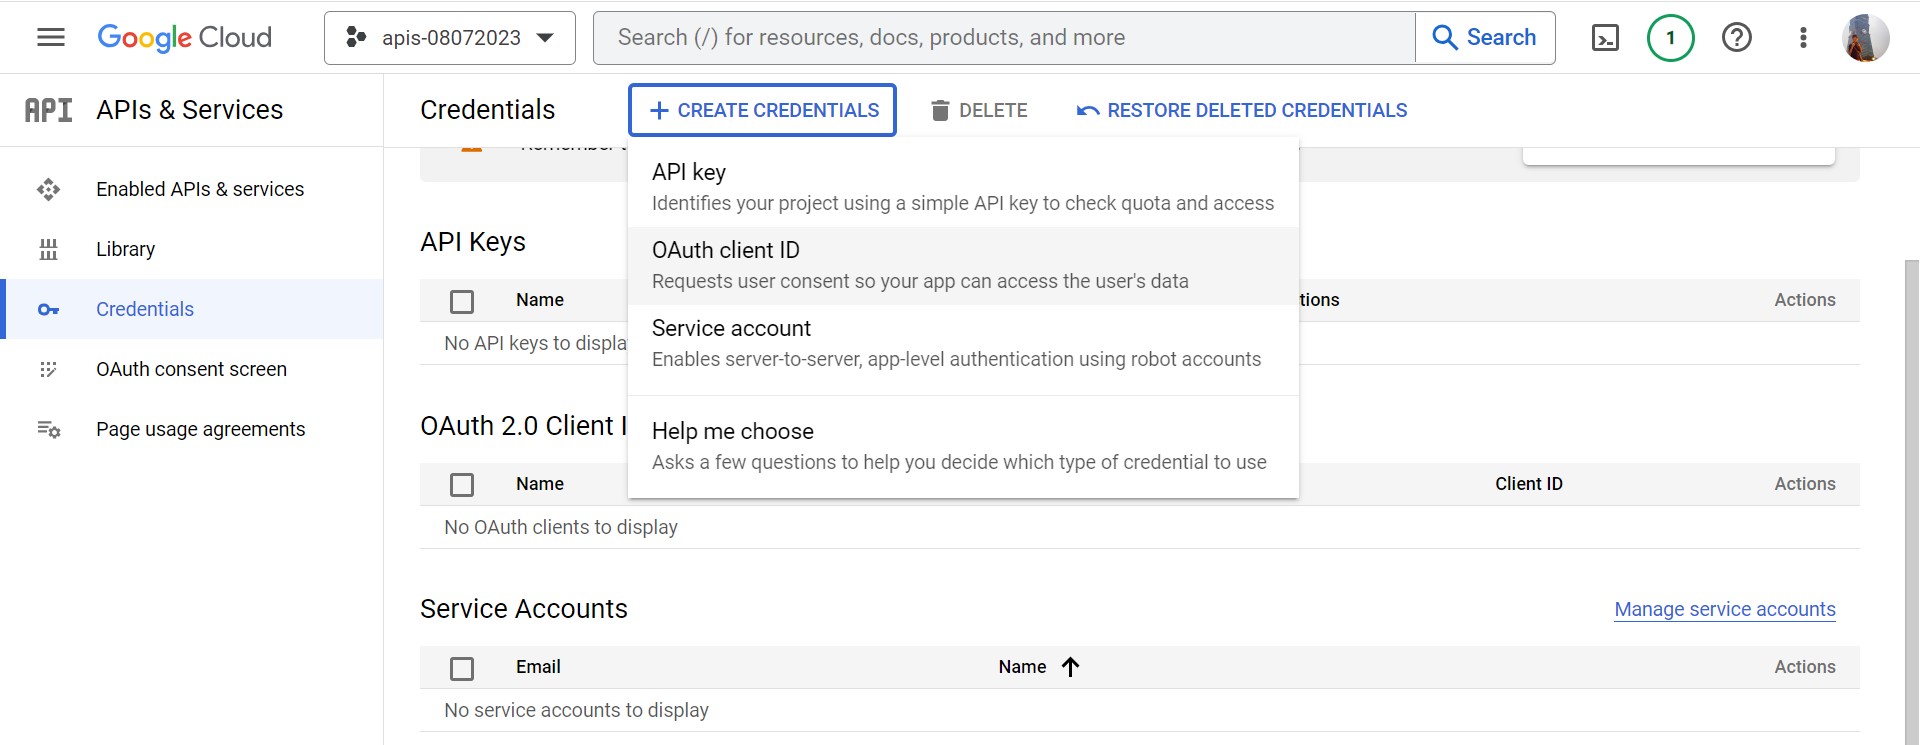
3. Enable Authorize Credentials
-
Click left side-bar Credentials
-
Click + CREATE CREDENTIALS and + OAuth client ID
-
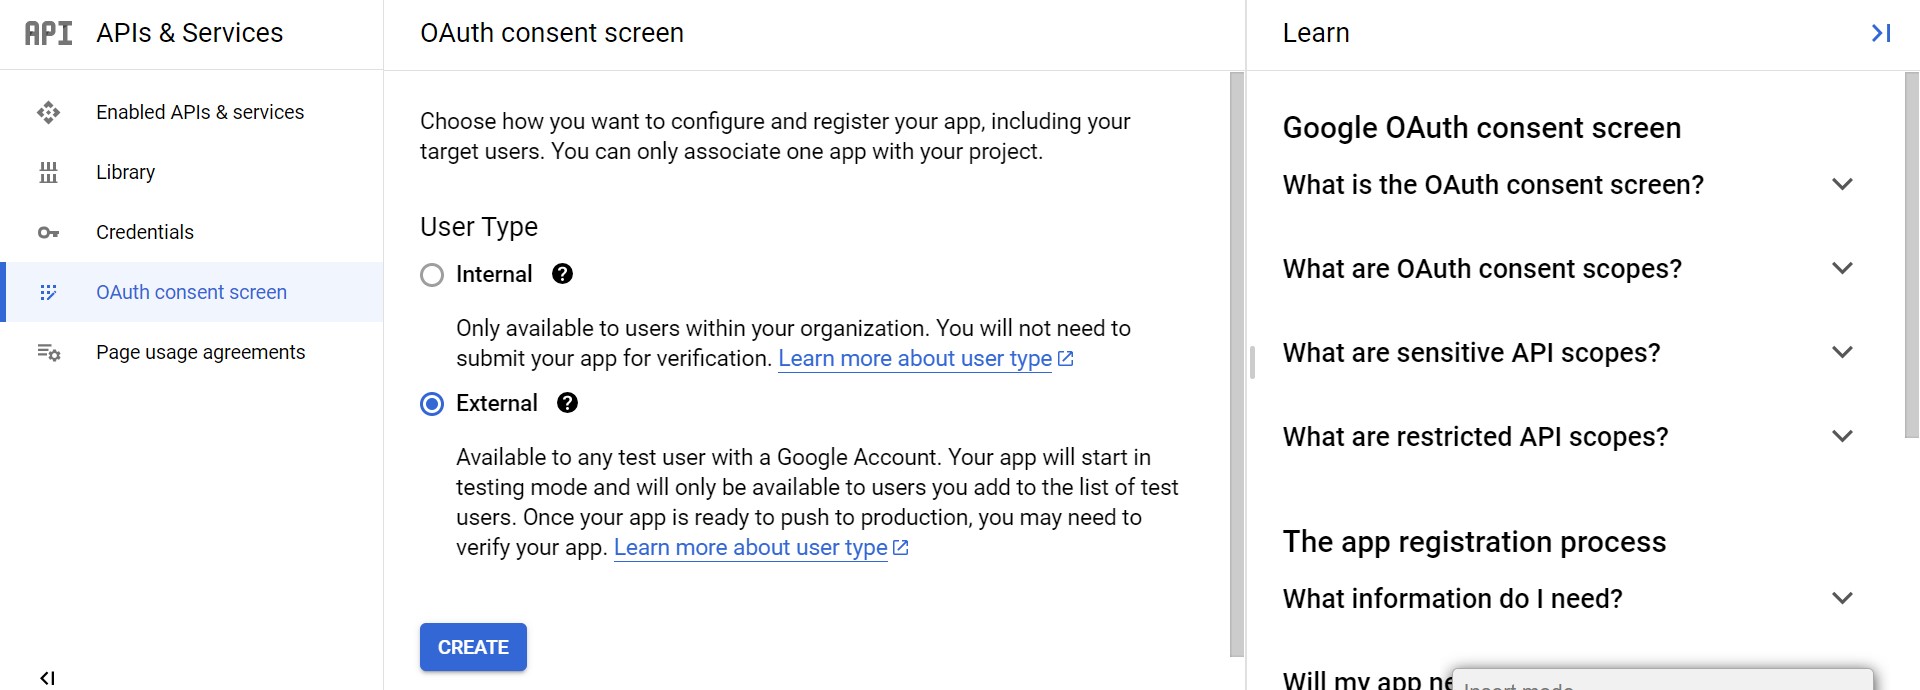
Click CONFIGURE CONSENT SCREEN

-
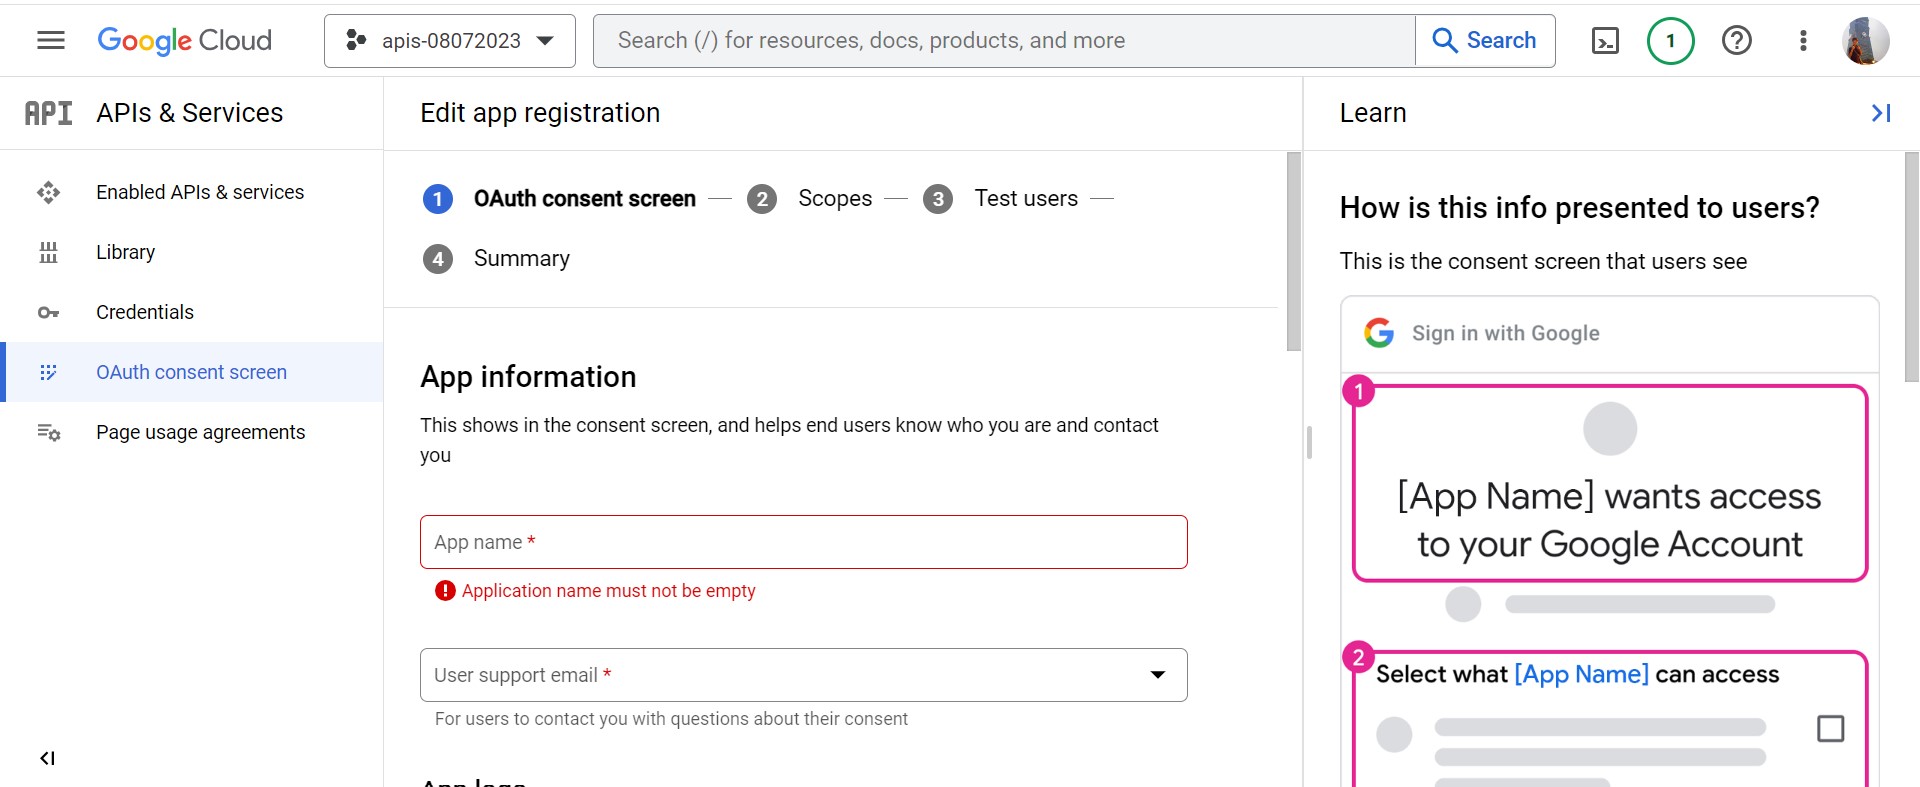
Create OAuth consent screen with External and click CREATE
- Edit app registration
- App Name: required
- User Email: required
- Develops Email: required
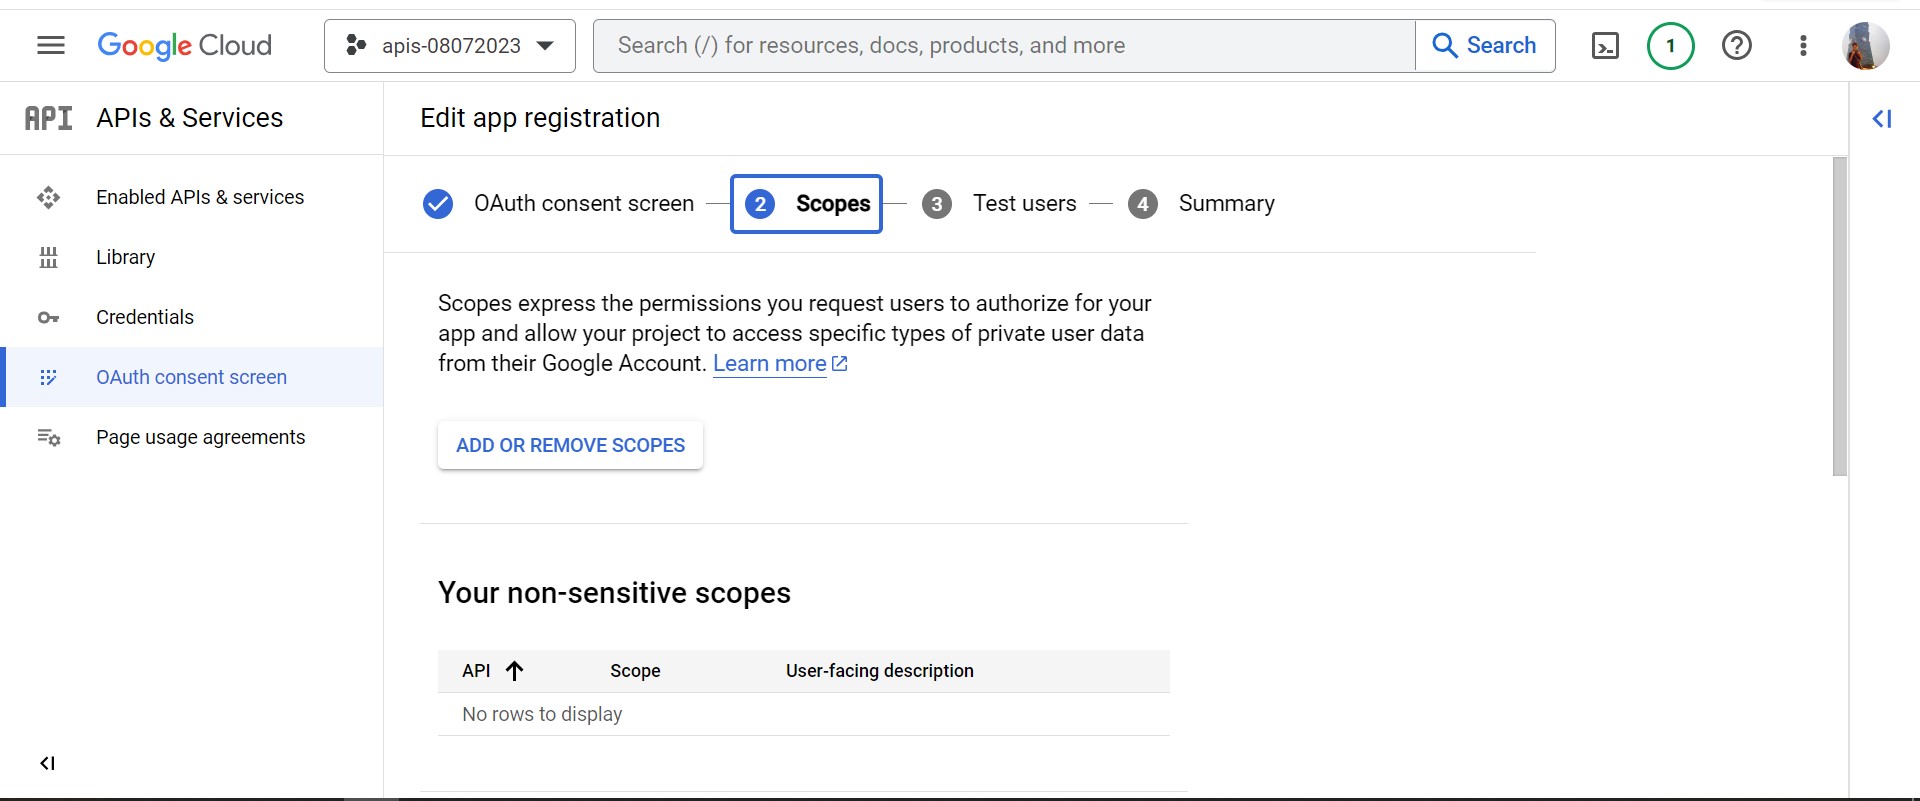
- Scopes
- click Save and Confirm
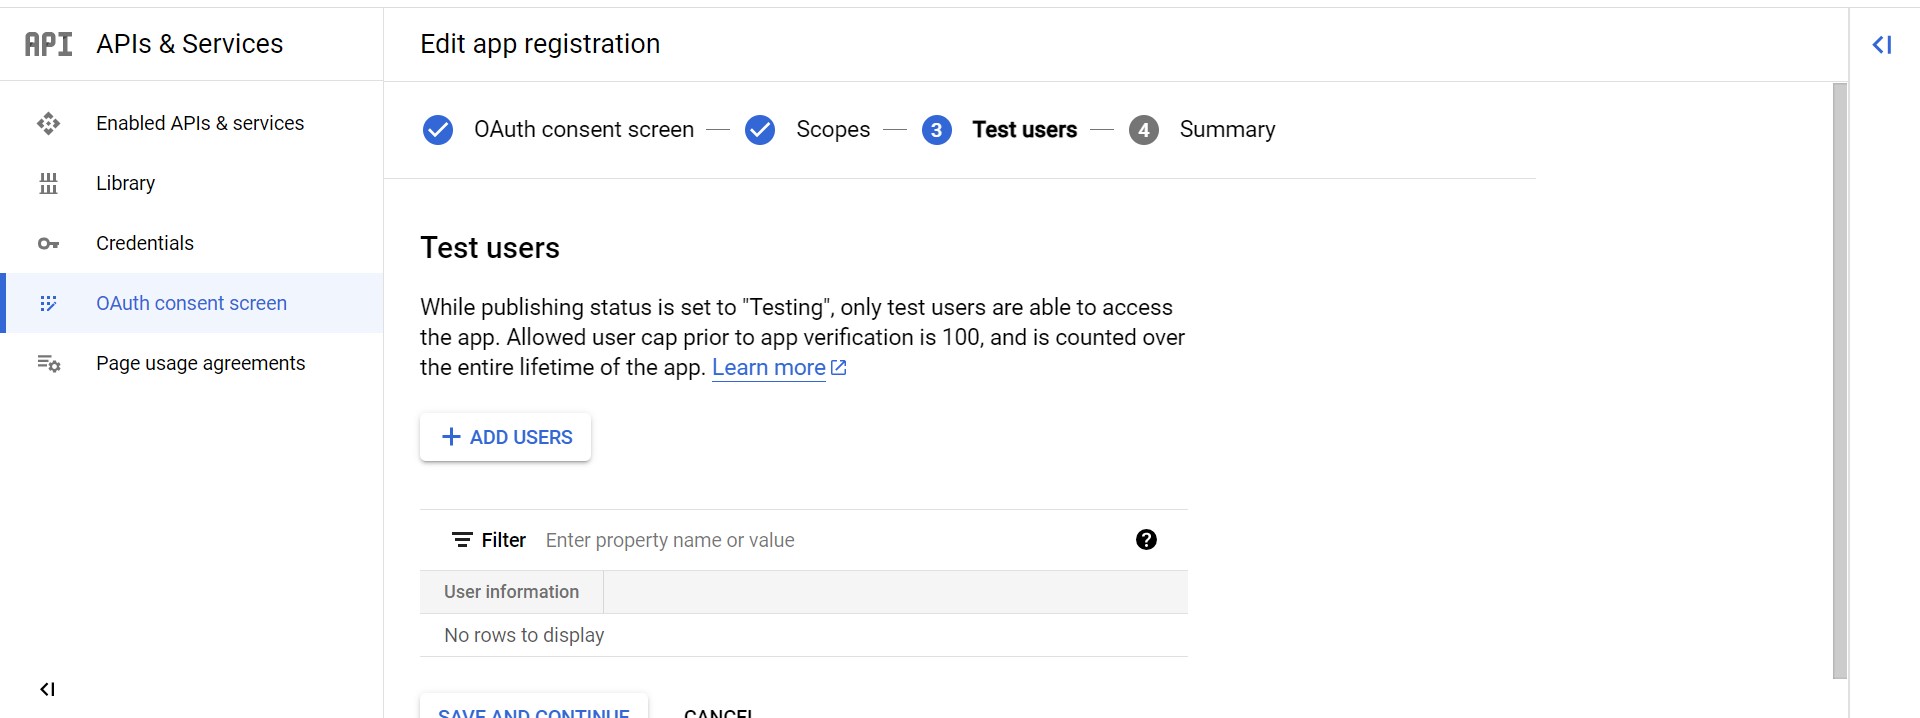
- Test Users
- click Save and Confirm
- Summary
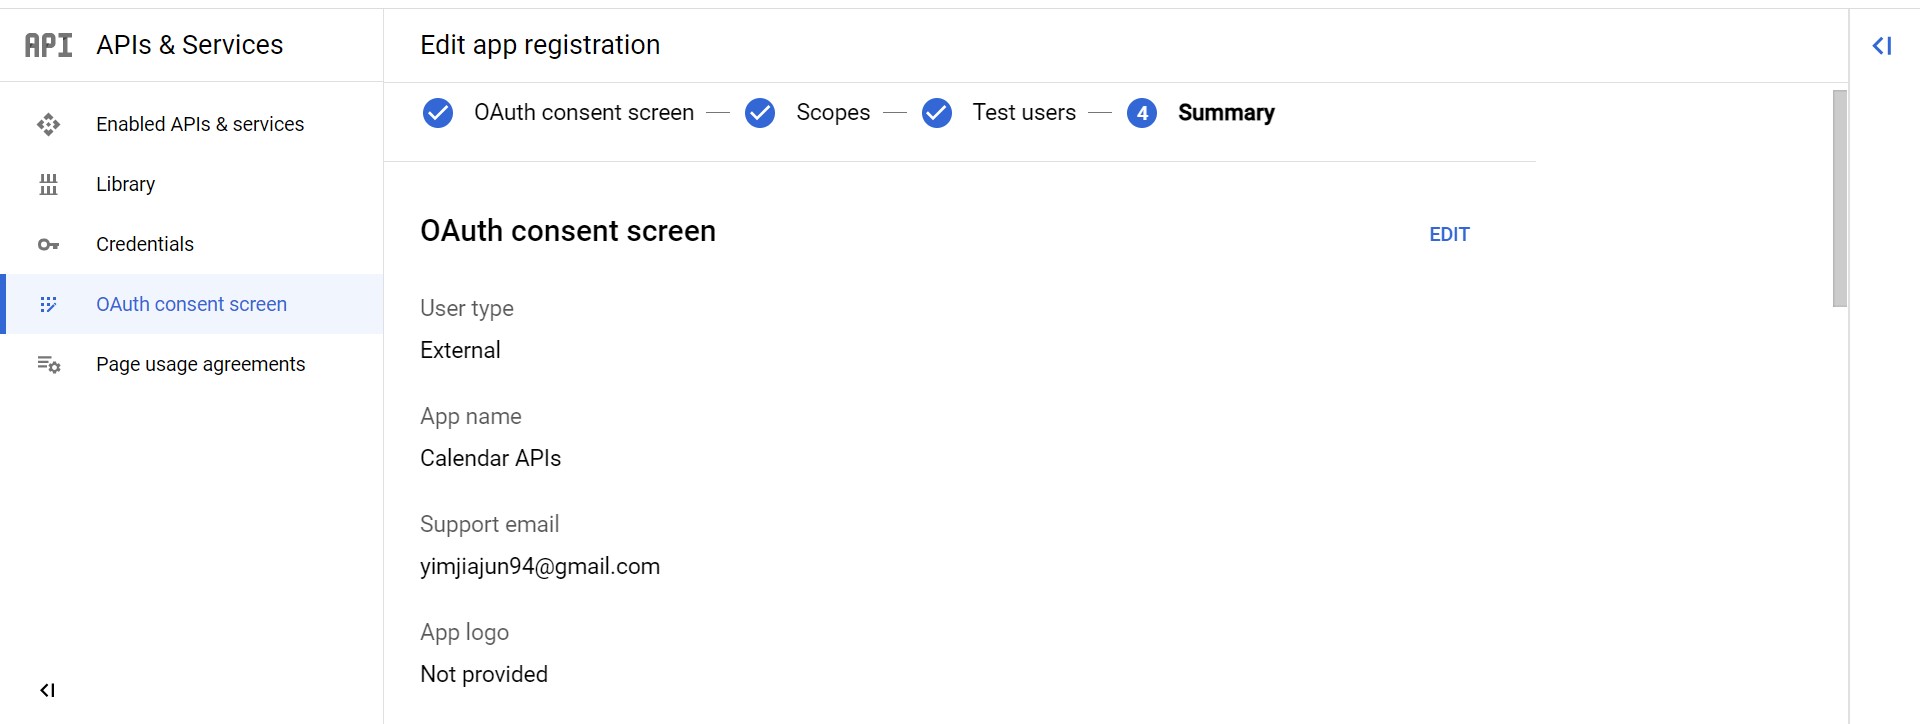
- Edit app registration
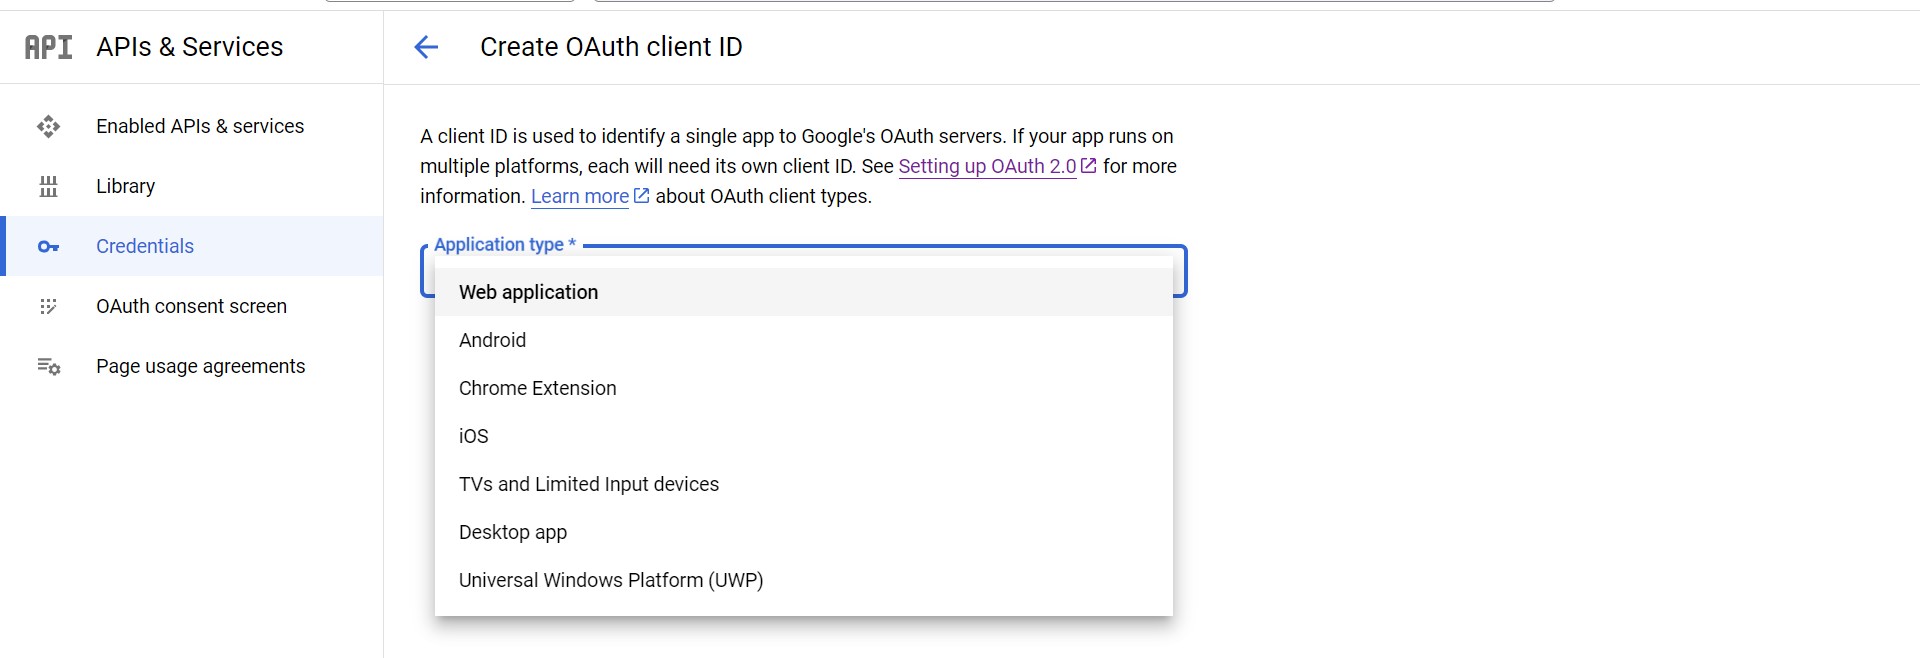
4. Enable Web Application
-
Click left side-bar Credentials
-
Click + CREATE CREDENTIALS and OAuth client ID then select Web Application
-
Create Web Application
redirect URLs:
http://127.0.0.11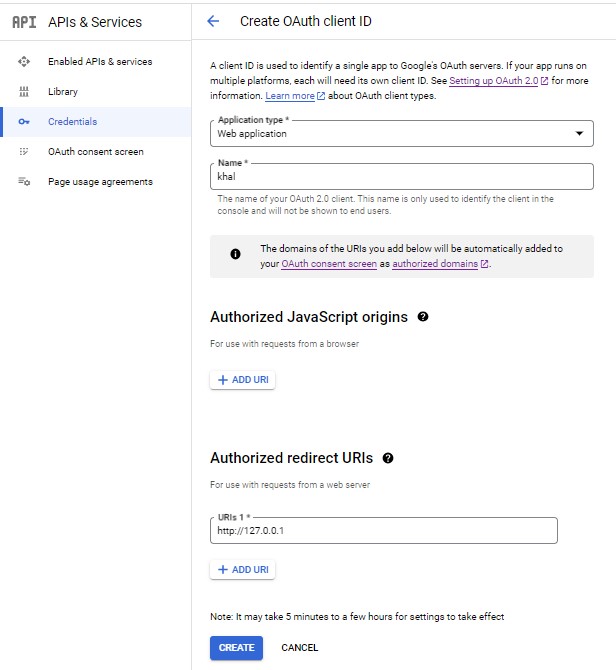
-
Created OAuth Client for Web application
Client ID+Client secret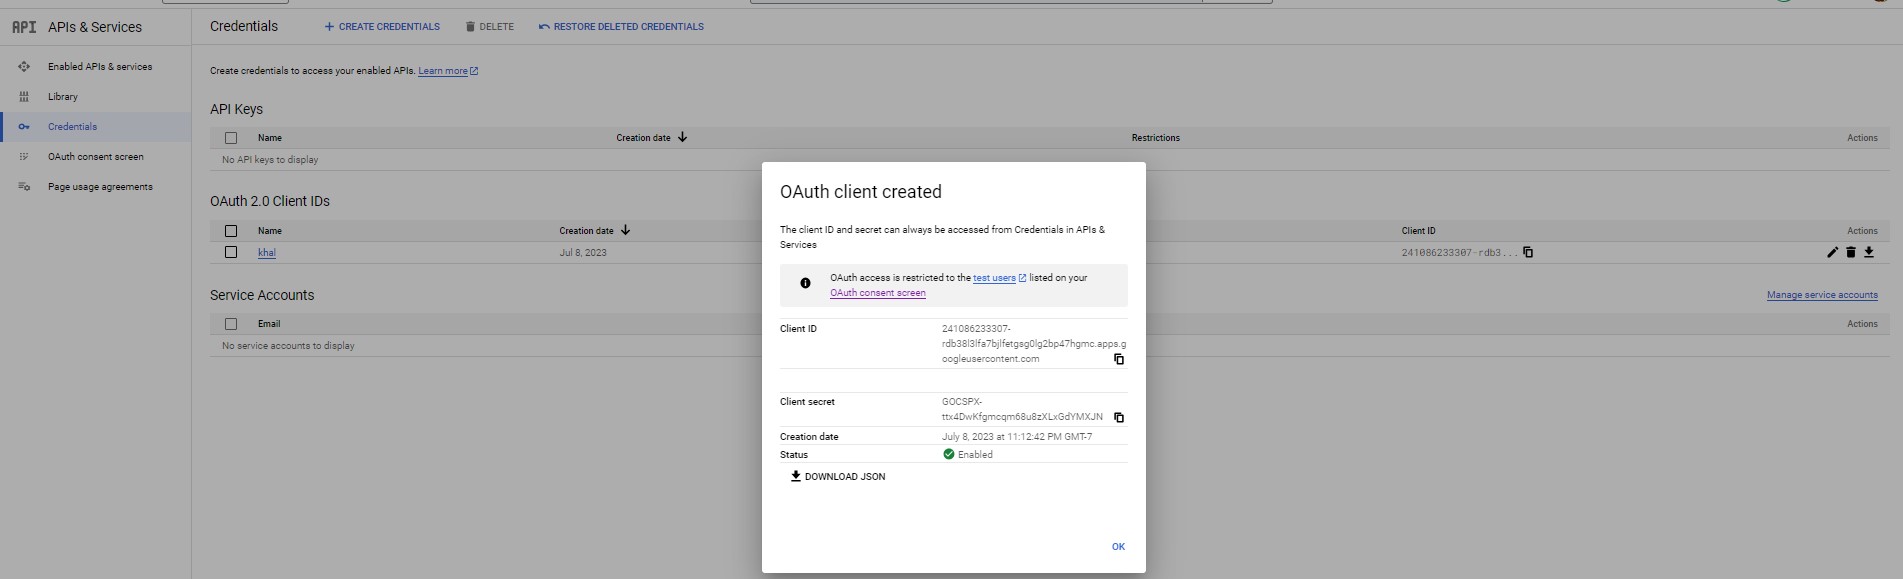
Configuration
1. Create vdirsyncer configuration file
mkdir -p ~/.config/vdirsyncer
touch ~/.config/vdirsyncer/config
2. Copy the contents below into configuration file
client_idandclient_secretis created from OAuth Client for Web Application
cat <<-EOF > ~/.config/vdirsyncer/config
[general]
status_path = "~/.calendars/status"

[pair personal_sync]
a = "personal"
b = "personallocal"
collections = ["from a", "from b"]
metadata = ["color"]

[storage personal]
type = "google_calendar"
token_file = "~/.vdirsyncer/google_calendar_token"
client_id = "241086233307-rdb38l3lfa7bjlfetgsg0lg2bp47hgmc.apps.googleusercontent.com"
client_secret = "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"

[storage personallocal]
type = "filesystem"
path = "~/.calendars/"
fileext = ".ics"
EOF
3. Discover google calendar via CalDav APIs
personal_syncis discover pair, please refer in configuration file above.
vdirsyncer discover personal_sync
4. Select google account

-
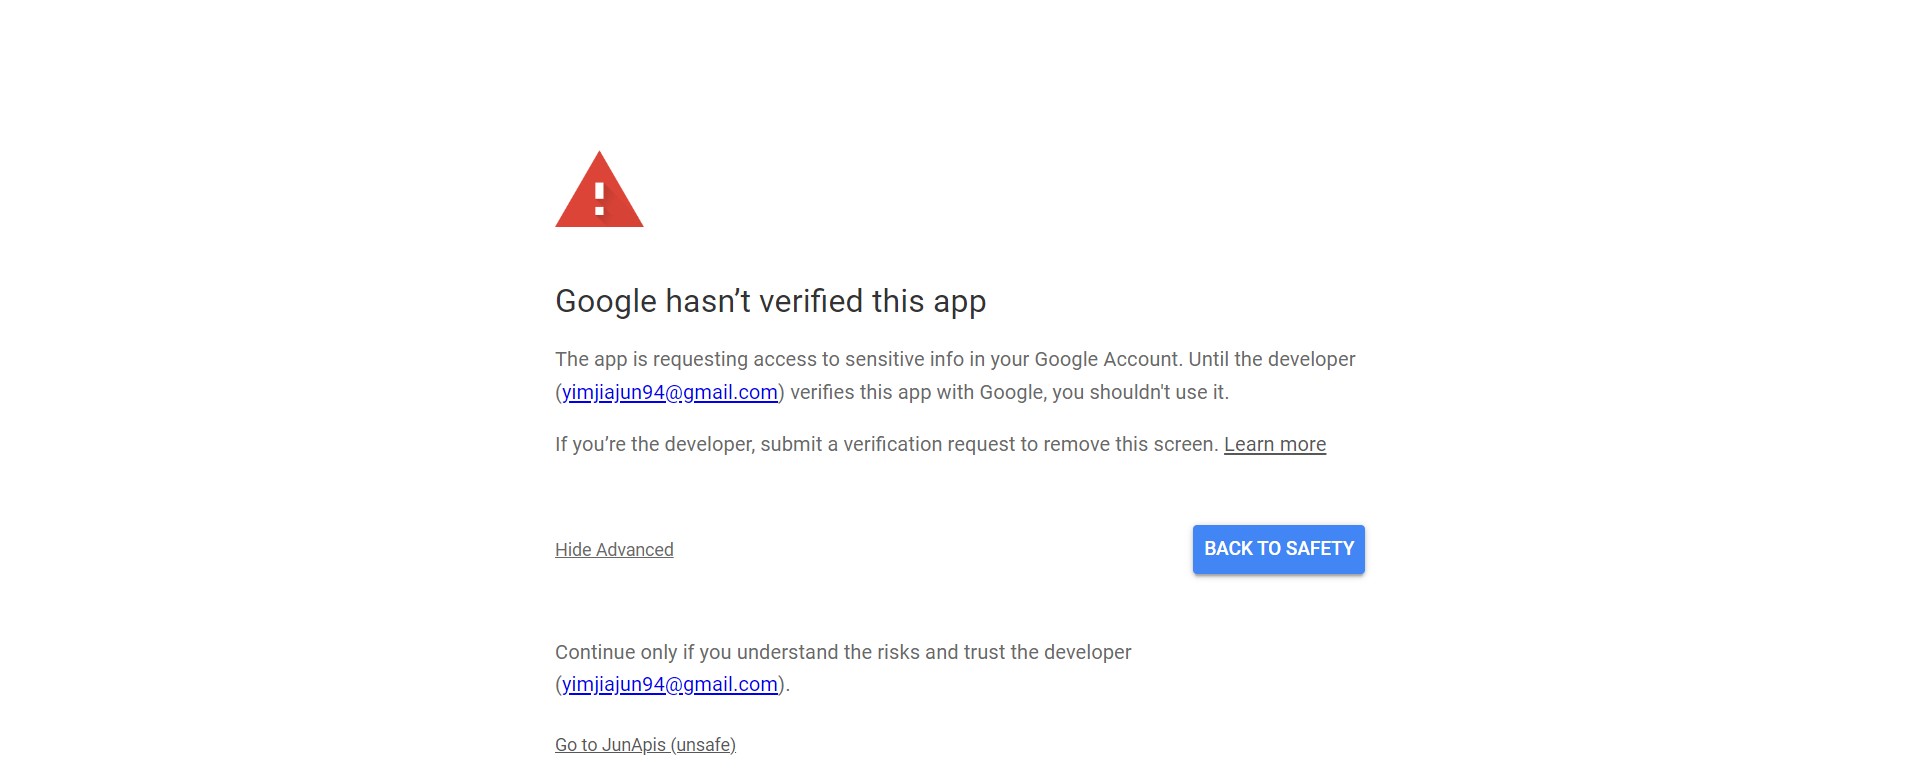
click Advanced and click Go to <api name> (unsafe)
-
Continue access calendar with APIs

-
Success obtained token

5. Sync Google Calendar
vdirsyncer sync
6. add category for each imported contents
- append into
~/.config/khal/configdepending on contents of~/.calendars/
[[ ${NAME} ]]
path = "~/.calendars/${content_file}"
color = blue
-
http://127.0.0.1: redirect url will discover by vdirsyncer with random port number ↩
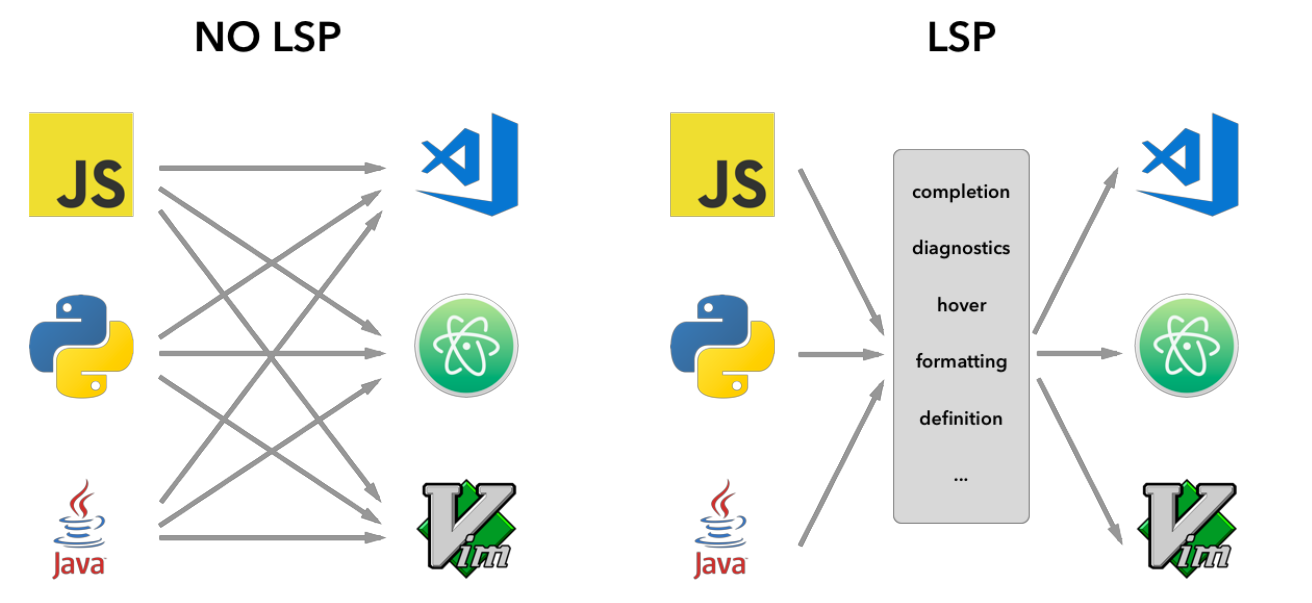
LSP (Language Server Protocol)
The Language Server Protocol (LSP) is a common protocol for communication between editors and language servers. The goal of the Language Server Protocol (LSP) is to standardize the protocol for how tools and servers communicate. This allows for a single language server (e.g. PHP, Python, etc.) to be re-used in multiple development tools, which in turn allows for more robust language support for editors.
Python
Python is a high-level, interpreted, interactive and object-oriented scripting language. Python is designed to be highly readable. It uses English keywords frequently where as other languages use punctuation, and it has fewer syntactical constructions than other languages.
Installation
Using pip:
-
Install Ruff:
pip install ruff
Ruff
Usage of Ruff Linting and Formatting Example
[[TOC]]
Linting
Check the code for errors:
ruff check <path/file>
Check and fix the code:
ruff check --fix <path/file>
Check and fix the code with ignore list:
ruff check --fix --ignore <RULES> <path/file>
-
Example:
F403:ami_ec.py:3:1: F403from scripts.ui import *used; unable to detect undefined namesIgnore this fixing message by
--ignore For--ignore F403ruff check --ignore F --fix <path/file>
Formatting
Format the code:
ruff format <path/file>
Pandoc
General markup converter
Pandoc is a Haskell library for converting from one markup format to another, and a command-line tool that uses this library.
Topic
Installation
Ubuntu
sudo apt-get install pandoc
Packages
Install pdf engine packages
apt-getfor Ubuntu
sudo apt-get install texlive-latex-base texlive-latex-extra texlive-xetex
Usage
To produce a PDF, specify an output file with a .pdf extension (Creating PDF)
Topic
Margins
By default the margins are pretty large. To optionally change the margin.
-V geometry:margin=1in
pandoc input.md -o output.pdf -V geometry:margin=1in
Newpage
Newpage between each markdown files. \break
sed -se '$a\\\break' *.md | pandoc -o output.pdf -V geometry: margin=1in --pdf-engine=xelatex
Font
Change font to match missing Unicode character. -V mainfont=
pandoc -o output.pdf -V geometry: margin=1in --pdf-engine=xelatex -V mainfont='DejaVuSerif' *.md
Size
Change font size. --variable fontsize=
```bash
pandoc nov_26.md -o output.pdf -V geometry:margin=1in --variable fontsize=10pt --variable fontfamily=utopia --variable linkcolor=blue --pdf-engine=xelatex -f markdown-implicit_figures -s
Table of contents
Include table of contents from heading. --toc
pandoc nov_26.md -o output.pdf --toc -V geometry:margin=1in pdf-engine=xelatex
Example
Run sample format to generate a pdf file (ex.sample.pdf) from input file (ex: input_sample.md)
pandoc -o sample.pdf -V geometry:margin=1in \
--toc --pdf-engine=xelatex \
--variable fontsize=10pt --variable fontfamily=utopia --variable linkcolor=blue \
-f markdown-implicit_figures -s -V mainfont='' input_sample.md
pass
the standard unix password manager
Password management should be simple and follow Unix philosophy. With pass, each password lives inside of a gpg encrypted file whose filename is the title of the website or resource that requires the password. These encrypted files may be organized into meaningful folder hierarchies, copied from computer to computer, and, in general, manipulated using standard command line file management utilities.
Topic
pass - Installation
sudo apt-get install pass
Initialize with key
1. Initialize pass tool with gpg key id
pass init <id of gpg-key>
mkdir: created directory '$HOME/.password-store/'
Password store initialized for <gpg-key id/pub key id>
2. Use git repository to records pass change/modify status
pass git init
Initialized empty Git repository in $HOME/.password-store/.git/
3. Setup remote git repository to backup password
pass git remote add origin <remote-rep-url>
4. Upload to remote git repository
pass git push -u origin main:HEAD
pass - Create a new password
Manual
1. Create new password for pass-name1
pass insert <pass-name>
Generate
1. Assign a generated password from pass for pass-name1
pass generate <pass-name>
pass - List password
1. Lists all pass-name
pass
2. Lists corresponding pass-name
pass find <pass-name>
pass - Search contents
1. Search pass-name contents, except secrete password
pass grep <contents>
pass - Show password
Show secrete/password from pass-name1 2
pass show <pass-name>
Copy to clipboard
Copy secrete/password to clipboard without display
pass show -c <pass-name>
-
DO NOT setup with username, this will displayed as file name. ex.
nvim,chatpgt/nvim↩ -
pass-name can being research by Tab ↩
pass - Change password
Change secrete/password from pass-name1 2
pass edit <pass-name>
-
DO NOT setup with username, this will displayed as file name. ex.
nvim,chatpgt/nvim↩ -
pass-name can being research by Tab ↩
pass - Delete password
Delete pass-name
pass rm <pass-name>
pass - Restore password
Restore deleted password by git
pass git revert HEAD
Other git command is allowable to using in restore
pass - Add additional information
Appending a additional secrete information in pass-name
pass edit <pass-name>
First Line of file is secrete password
Include email in this example
... (screate password)
email: RichardYim@ami.com
OpenSSH is the premier connectivity tool for remote login with the SSH protocol. It encrypts all traffic to eliminate eavesdropping, connection hijacking, and other attacks. In addition, OpenSSH provides a large suite of secure tunneling capabilities, several authentication methods, and sophisticated configuration options.
Topic
| sections | sub-sections | items | |
|---|---|---|---|
| 1 | Algorithm | ||
| 2 | Command | Generate Key | Example |
| Copy Public Key |
Algorithm
-t | rsa | ed25519 | ecdsa | dsa |
|---|---|---|---|---|
-b | 2048/4096/8192 | - | - | - |
Command
Generate Keys
ssh-keygen -t $algo -b $byte -C $comment -f $HOME/.ssh/$algo
-
-t/$algo: rsa / ed25519 / ecdsa / dsa -
-b/$byte: rsa (2048/4096/8192) -
-C/$comment: optional- github: email
-
-f: key generated path
example
1. rsa
ssh-keygen -t rsa -b 2048 -C usrname@email.com -f $HOME/.ssh/.id_rsa
2. ed25519
ssh-keygen -t ed25519 -C usrname@email.com
Copy Public Key
-
check available public key
ls $HOME/.ssh/*.pub -
copy one of public key to clipboard
xclip -sel clip < $algo.pub -
paste the public key to server: ctrl + v
SSH - USAGE
[[TOC]]
Connection
secure shell
SSH uses direct TTY access to ensure that the password is indeed issued by an interactive keyboard use.
ssh access into the remote device:
ssh <username>@<hostname/ip address>
sshpass
runs SSH in a dedicated TTY, fooling SSH into thinking it is getting the password from an interactive user.
three way for sshpass access into remote device:
-
provides password from argument
sshpass -p <password> ssh <username>@<hostname/ip> -
provides password from the 1st line of file
sshpass -f <file> ssh <username>@<hostname/ip> -
provides passrd from environment value
sshpass -e ssh <username>@<hostname/ip>
more reference: sshpass usage
Transfer file
Securely Copy (scp)
securely copy a file into the remote device root path (default path):
scp <file> scp:<username>@<hostname/ip address>/<remote path>
securely copy a file from remote device:
scp scp:<username>@<hostname/ip address>/<remote path>/<file> <local file>
Securely File Transfer Protocol (sftp)
securely copy file between remote device
-
connect to remote device
sftp <username>@<hostname/ip address>/<remote path> -
indicates
sftp >, connected with remote device-
send file to remote device
put <file> -
receive file from remote device
get <file>
-
Command
Run command on remote device
ssh <username>@<hostname/ip_address>/<remote_path> '<command>'
Authorization
copying the local host’s public key to the remote host’s authorized keys file and by verifying file permissions and ownership
ssh-copy-id -i <public key> <username>@<hostname/ip address>
SSH - disown
Introduction
disown, removes the job from the process job list of the system,
so the process is shielded from being killed during session disconnection as
it won’t receive SIGHUP by the shell when you logout.
Disadvantage:
Used only for the jobs that do not need any input from the stdin and neither need to write to stdout
try to interact with stdin or stdout, it will halt
Usage
1. run a program to background
ping www.ami.com -4 1>/dev/null 2>&1 &
Response PID:
[1] 48069
2. list running jobs:
jobs -l
[1]+ 48069 Running                 ping www.ami.com -4 > /dev/null 2>&1 &
3. removes the job from the process job list of the system: pass disown signal to job
disown -h %1
4. exit ssh and re-login remote server
exit
# reconnect
ssh name@hostname
5. check the jobs list, the previous job is still running:
ps -ef | grep ping
jun        48069    8998  0 21:11 pts/6    00:00:00 ping www.ami.com -4
jun        48071    8998  0 21:11 pts/6    00:00:00 grep --color=auto ping
SSH - nohup
Introduction
nohup tell the process to ignore the SIGHUP signal
which is sent by ssh session on termination, thus making the command persist
even after session logout. On session logout the command is detched from
controlling terminal and keeps on running in background as daemon process.
Usage
nohup with running task at background was sent to background with prompt
returning immediately giving PID and job ID of the process ([JOBID] PID).
1. run a program to background with nohup:
nohup ping www.ami.com 1>/dev/null 2>&1 &
TFTP (Trivial File Transfer Protocol)
Transfer file from/to remote PC
TFTP transfers files to and from a remote computer, typically a computer running UNIX, that is running the Trivial File Transfer Protocol (TFTP) service or daemon. TFTP is typically used by embedded devices or systems that retrieve firmware, configuration information, or a system image during the boot process from a TFTP server, says TechNet.
Install
Window 1
TFTP is disabled by default in Windows
-
Open Program install and uninstall
-
press win + R to open Run dialog
-
type "appwiz.cpl" and press Enter
-
-
On the left-side bar, will found the Turn Windows features on or off, and click it
-
Search for TFTP client
- mark it for enable, if didn't enable
-
start install the TFTP client as indicate Apply changes, until display Windows completed the requested changes
-
Successfully enabled TFTP client
-
Testing tftp is enabled
tftp
tftp usage:
-
tftp enable on windows. Reference link: TFTP on windows ↩
SFTP
SSH File Transfer Protocol (also known as Secure File Transfer Protocol or SFTP) is a network protocol that provides file access, file transfer, and file management over any reliable data stream. -- wiki
[[TOC]]
Usage
Connection
Connect to remote device by HostName/IP with UserName (ex. <host_name>@
sftp 192.1.1.1@richardyim # sftp <host_name>@<username>
The prompt will change to
sftp>. The following are the available commands.
Commands:
| Target | Command | Description |
|---|---|---|
| remote | ls | List files in remote device path |
| local | lls | List files in local device path |
| remote | cd | Change directory in remote device path |
| local | lcd | Change directory in local device path |
| local -> remote | put <local_file> | Send file from local to remote device |
| local <- remote | get <remote_file> | Receive file from remote device to local device |
| local | exit | Exit from remote device |
Guide
Local Device:
|_ Documents
  |_ A.txt
  |_ B_directroy
    |_ B_1.txt
    |_ B_2.txt
  |_ C.txt
|_ Downloads
Remote Device:
|_ R_Documents
  |_ R.txt
  |_ R_B_directroy
    |_ R_B_1.txt
    |_ R_B_2.txt
  |_ R_C.txt
- We execute
sftpfrom local device to connect to remote device in path home directory (*: indicates the current path).
*  -----[ sftp <host_name>@<username> ]  -----> *
*_ Documents                                    *_ R_Documents
* |_ A.txt                                         |_ R.txt
* |_ B_directroy                                   |_ R_B_directroy
* | |_ B_1.txt                                     |  |_ R_B_1.txt
* | |_ B_2.txt                                     |  |_ R_B_2.txt
* |_ C.txt                                         |_ R_C.txt
*_ Downloads
-
We execute
lsto list files in remote device path.sftp> lsWe will see the following output.
R_Documents -
We execute
cdto change directory in remote device pathsftp> cd R_Documents sftp> lsWe will see the following output. Which is contents inside the R_Documents directory.
R.txt R_B_directroy R_C.txt -
We execute
getto receive file from remote device to local device.sftp> get R.txtWe will see the following output. The R.txt file is copied to local device.
<-----[ get R.txt ] ----- *_ Documents |_ R_Documents * |_ A.txt | *_ R.txt * |_ B_directroy | *_ R_B_directroy * | |_ B_1.txt | * |_ R_B_1.txt * | |_ B_2.txt | * |_ R_B_2.txt * |_ C.txt | *_ R_C.txt *_ Downloads *_ R.txt (copied) -
We execute
llsto list files in local device path.sftp> llsWe will see the following output.
Documents Downloads R.txt -
We excute
lcdto change directory in local device path.sftp> lcd Documents sftp> llsWe will see the following output. Which is contents inside the Documents directory.
A.txt B_directroy C.txtStatus of the files in local device.
|_ Documents |_ R_Documents | *_ A.txt | *_ R.txt | *_ B_directroy | *_ R_B_directroy | * |_ B_1.txt | * |_ R_B_1.txt | * |_ B_2.txt | * |_ R_B_2.txt | *_ C.txt | *_ R_C.txt |_ Downloads |_ R.txt (copied) -
We execute
putto send file from local device to remote device.sftp> put C.txtWe will see the following output. The C.txt file is copied to remote device.
-----[ put C.txt ] -----> |_ Documents |_ R_Documents | *_ A.txt | *_ R.txt | *_ B_directroy | *_ R_B_directroy | * |_ B_1.txt | * |_ R_B_1.txt | * |_ B_2.txt | * |_ R_B_2.txt | *_ C.txt | *_ R_C.txt |_ Downloads | *_ C.txt (cpoied) |_ R.txt -
We execute
lsto list files in remote device path.sftp> lsWe will see the following output. Which is C.txt inside the R_Documents directory.
R.txt R_B_directroy R_C.txt C.txt -
Execute
exitto exit from remote device.sftp> exit
SALEAE
Effortlessly decode protocols like SPI, I2C, Serial, and many more. Leverage community created analyzers or build your own low-level or high-level protocol analyzer.
software download: Logic
Introduction
Execute Program
Executable program for saleae software in window:

Home page
Home page without connecting saleae device

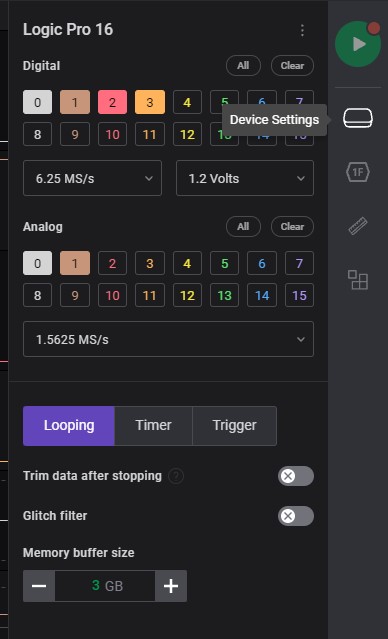
Device Settings
Connector settings to enable / disable displays connector and measurement frequency.
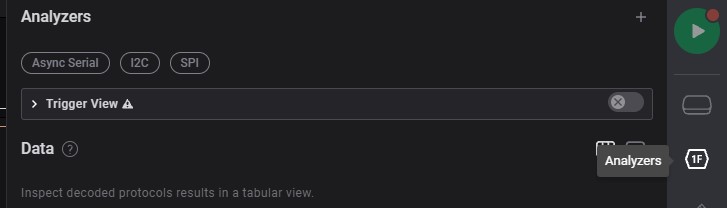
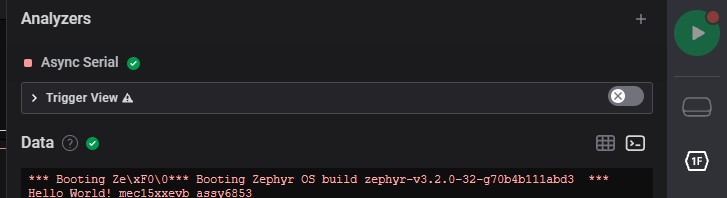
Analyzers
This sections is customize or selection on connecting interface. Which is able to analyze connecting interface as data.
-
The first icon on right side-bar
-
Add Filter: select connecting interface
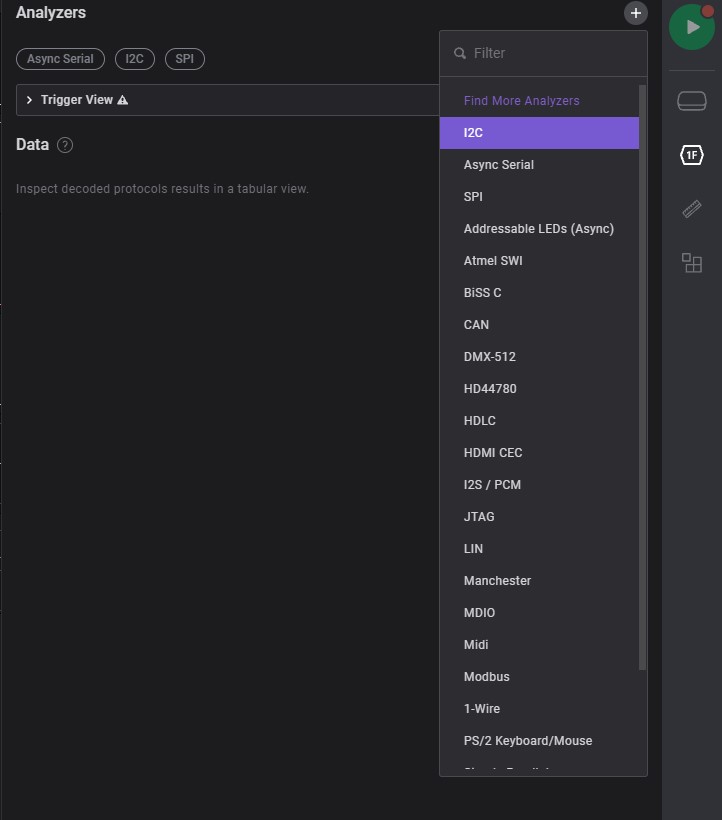
-
Data Table: displays analyzed data datails (ex. i2c)
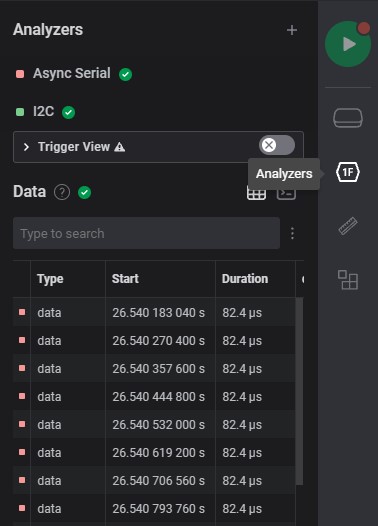
-
Terminal: displays analuzd data / ascii / etc. on display as terminal (ex. serial)
Measurements
Measurement specfic range of signal details

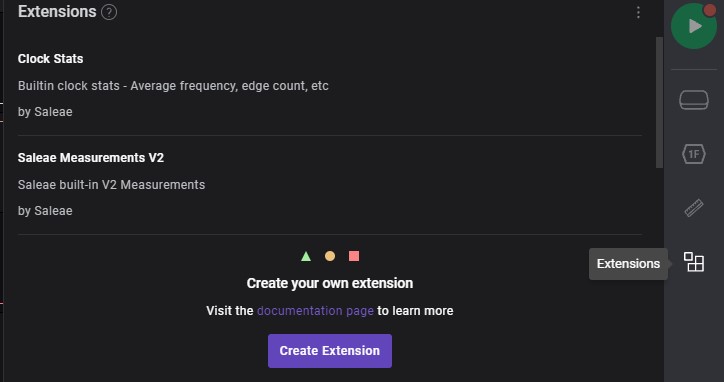
Extensions
Extra setup from other users. which able to implements on own project to improve measurement.
SALEAE - NOTE
How-to-Note on Saleae program
TOPIC:
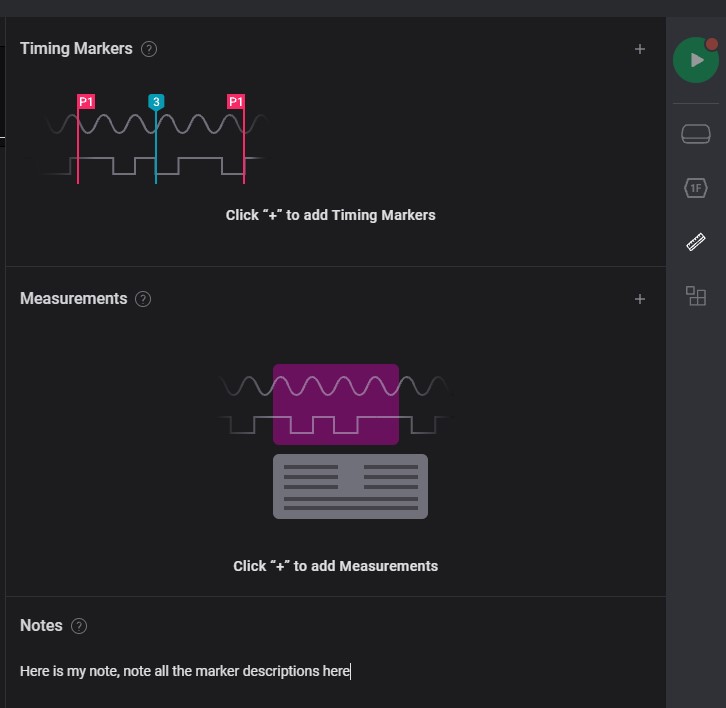
Timing Markers and Measurement, Notes
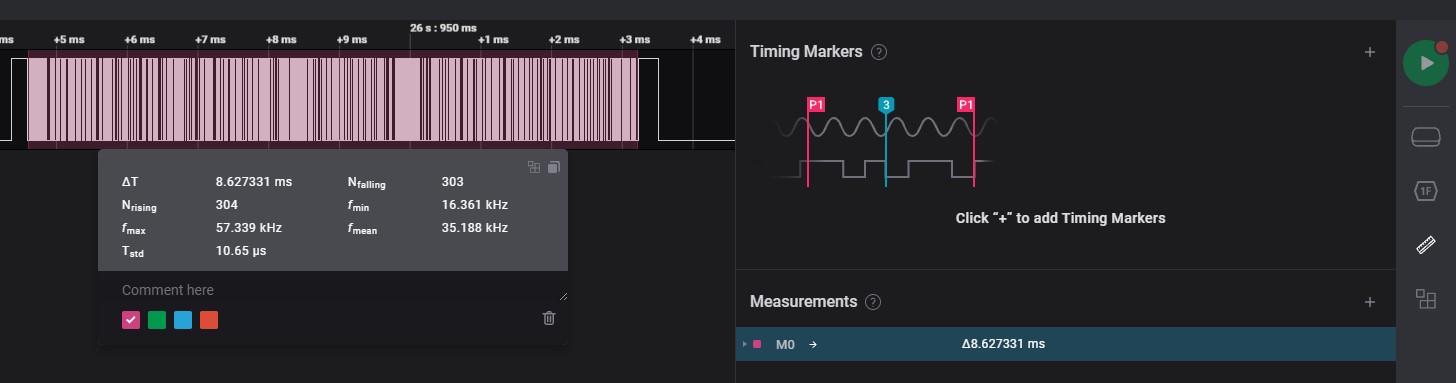
Specific range of signal to measurement

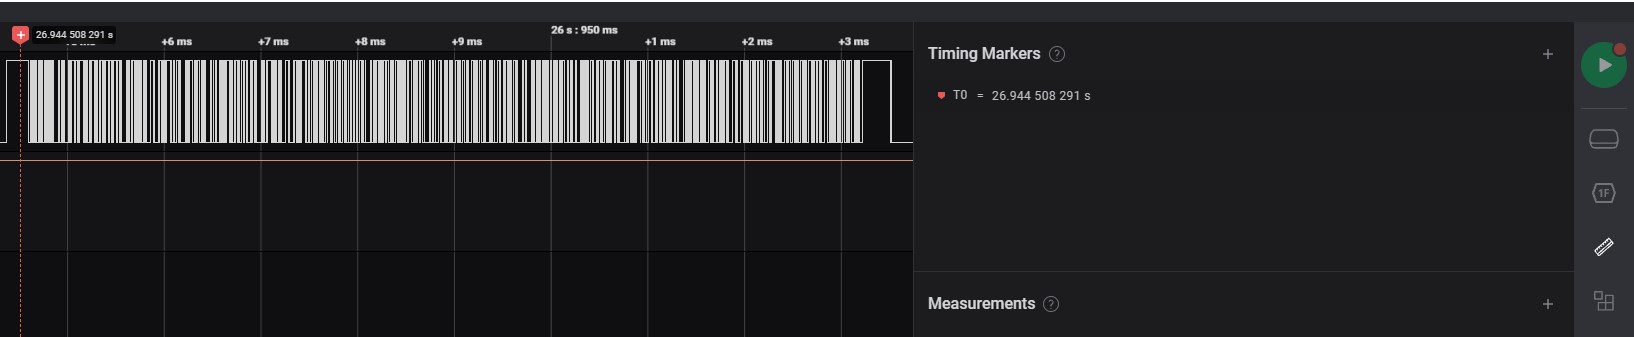
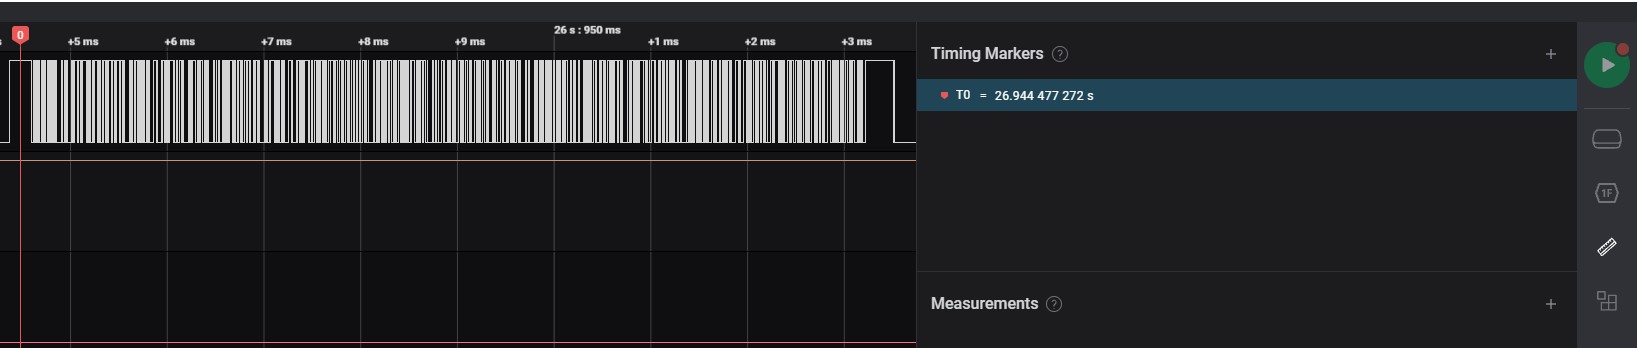
Timing Markers
Specific timing on measurement

Add Single Marker
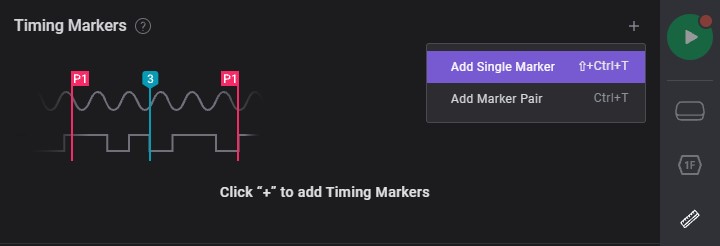
-
Move to specific timing of signal to measurement
-
Click the primary button of mouse to select measurement timing
Add marker pair
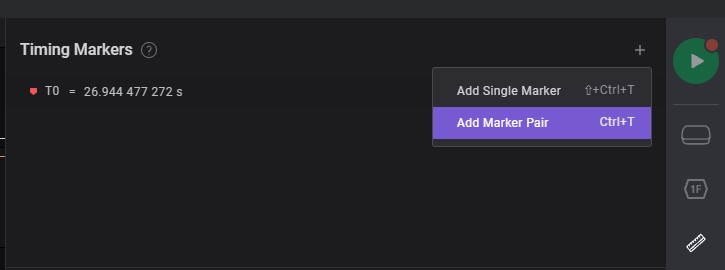
-
Move to begin on specific timing of signal to measurement

-
Move to end on specific timing of signal to measurement

-
After selected a pair of specific timing

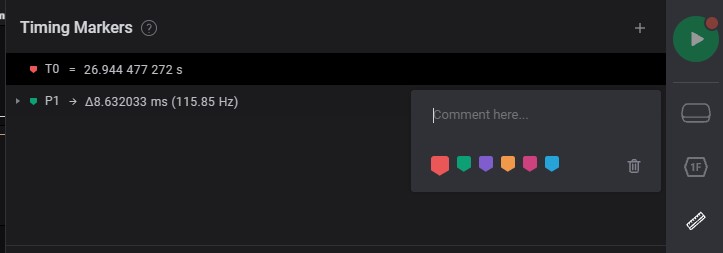
timing markers note
Add some details or bookmarks on specific timing
-
Click the 3 dots
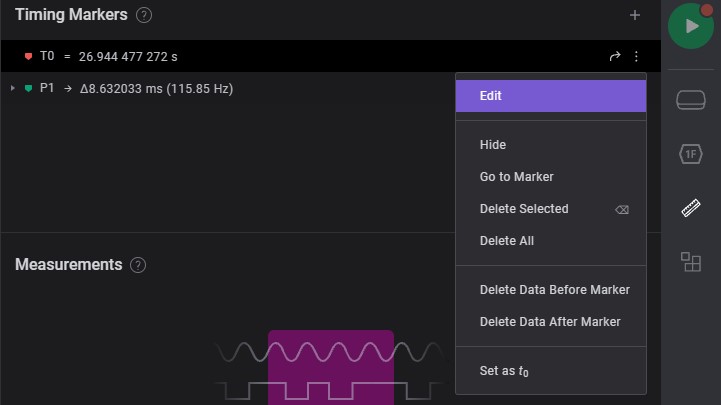
-
Add comment/details of signal
Measurement
-
Select begin of signal to measurement

-
Select end of signal to measurement

-
After selected of signal to measurement
Notes
Sharing details of signal information
RSYNC
rsync is a file transfer program capable of efficient remote update
via a fast differencing algorithm.
Sync new updated/modified sources on target device, which minimum the transfer size of data to target device and more fastest.
RSYNC - Transfer
Topic:
Parameter
-r: recursive sync-a:-rrecursive sync with permission, date, user, group and etc.
Options:
P: overview transfer progress and transferring partialv: verbose--force: force deletion of dirs even if not empty--delete: delete extraneous files from destination dirs--exclude=: exclude files to sync
to Remote device
-
sync entire directory to remote device
rsync -a <directory> <username>@<hostname>:<remote_path> -
sync files in directory to remote device (with backslash
/)rsync -a <directory>/ <username>@<hostname>:<remote_path>
to Local device
Similar as to Remote device, swap the position of path between local and remote directory.
-
sync entire directory to local device
rsync -a <username>@<hostname>:<remote_path> <directory> -
sync files in directory to local device (with backslash
/)rsync -a <username>@<hostname>:<remote_path>/ <directory>
Overview transfer information
-
Overview transferring partial and progress from local to remote device
rsync -avP <directory>/ <username>@<hostname>:<remote_path>
Delete source device non-exists directory on target device
-
Sync non-exists directory from local on remote device
rsync -a --force <directory>/ <username>@<hostname>:<remote_path>
Delete source device non-exists sources on target device
-
Sync all the sources from source (ex. Local) device to target (ex. Remote) device
rsync -a --delete <directory>/ <username>@<hostname>:<remote_path>
Sensors
print sensors information (ex. fan speed, temperature ...)
Topic
Installation
Debian/Ubuntu
sudo apt-get install lm-sensors
Display
Command
sensors - print sensors information
Display sensors information
watch - execute a program periodically, showing output fullscreen
all sensors information
watch -n1 -d sensors
fan information
watch -n1 -d 'sensors | grep fan'
fan and temperature information
watch -n1 -d 'sensors | egrep "fan|temp" | grep -v "0.0"'
MD5
md5 <file>
Mount
Mount a filesystem
Virtual Machine Link Host Directory
Mount - USB format
exFAT
expand version of FAT32
Compatible (w/r): Macs
Benefit: utilize every last bit of available capacity rather than having it constrained by system partitions.
Best filesystem for transferring files between Window and Linux:
- USB flash device
- SD device
- embedded device
FAT32
Create: 1977 (oldest)
Compatible (w/r): DOS, Window (up to 8), Max OS X and many UNIX-drived operting system (Linux and FreeBSD)
NTFS
Create: 1993
Support: Windows NT3.1 and XP to 8, wholly Windows
Compatible (r): Mac OS X 10.3 and latest versions1
Heavy data overhead
EXT
Create: 2008
Support: Linux
Compatible (native2): Window * Macs
Ext4 changes crucial filesystem data structures, including those that store file data.
-
require third-party application: Paragon NTFS ↩
-
making a tiny FAT32 partition, copying or installing a program like Ext2Fsd, and formatting the remaining space as ext4. ↩
MOUNT USB DEVICE INTO WSL
[[TOC]]
USAGE
1. Lists connecting USB device
-
Example devices showing as below:
$ powershell.exe -C usbipd wsl listOutput message:
BUSID  VID:PID    DEVICE                                                        STATE
1-6    0403:6001  USB Serial Converter                                          Not attached
1-9    05ac:024f  USB Input Device                                              Not attached
1-10   320f:221d  USB Input Device                                              Not attached
1-12   0bda:0169  Microsoft Usbccid Smartcard Reader (WUDF), Realtek USB 2....  Not attached
2. Attach USB device
-
Example to attach USB serial Converter, which
BUSIDis 1-6 into WSL1$ powershell.exe -C usbipd wsl attach --busid 1-6 -
Check the attached USB device, will found the STATE of BUSID 1-6 have attached on Ubuntu distribution as Attached - Ubuntu
$ powershell.exe -C usbipd wsl listoutput message:
BUSID  VID:PID    DEVICE                                                        STATE
1-6    0403:6001  USB Serial Converter                                          Attached - Ubuntu
1-9    05ac:024f  USB Input Device                                              Not attached
1-10   320f:221d  USB Input Device                                              Not attached
1-12   0bda:0169  Microsoft Usbccid Smartcard Reader (WUDF), Realtek USB 2....  Not attached
3. Check USB lists on WSL
-
Attached USB device will indicated in WSL USB list.
$ lsusboutput message:
IDis theVID:PIDinusbpid wsl list, we can found the example BUSID: 1-6 VID:PID is 0403:6001, which isBus 001 Device 002in WSLBus 002 Device 001: ID 1d6b:0003 Linux Foundation 3.0 root hub Bus 001 Device 002: ID 0403:6001 Future Technology Devices International, Ltd FT232 Serial (UART) IC Bus 001 Device 001: ID 1d6b:0002 Linux Foundation 2.0 root hub
4. Detach USB device
-
Detach USB device to release from WSL and return control to Windows
$ powershell.exe -C usbipd wsl detach --busid 1-6
TROUBLESHOT
MULTIPLE DISTRIBUTIONS INSTALLED ON WSL
Attach USB device on mutiple installed distributions will indicated errors as below:
$ powershell.exe -C usbipd wsl attach --busid 1-6
-
output message:
usbipd: info: Using default WSL distribution 'Ubuntu'; specify the '--distribution' option to select a different one.
Solution: specify WSL distribution to use via --distribution
-
List running WSL
$ powershell -C wsl --list --runningoutput message:
Windows Subsystem for Linux Distributions: Ubuntu (Default) -
Specify WSL distribution to attach USB device via
--distributiononUbuntudistribution$ powershell.exe -C usbipd wsl attach --busid 1-6 --distribution Ubuntu
PRIVILEGE ATTACH USB
First time attach USB device will need privilege access, indicated error as below:
$ powershell.exe -C usbipd wsl attach --busid 1-6 --distribution Ubuntu
-
output message:
usbipd: error: Access denied; this operation requires administrator privileges.
usbipd: info: The first time attaching a device to WSL requires elevated privileges; subsequent attaches will succeed with standa
rd user privileges.
Solution: Open Powershell.exe as Administrator to attach USB device
-
Example: usbipd's busid=1-6 and WSL distribution=Ubuntu
PS C:\WINDOWS\system32> usbipd wsl attach --busid 1-6 --distribution Ubuntu
-
Issue facing on attach, please reference Distribution and Privilege ↩
Mount - USB Mass Storage Device
Window Subsystem with Linux (WSL)
1. Plug in USB Mass Storage Device / Flash
2. Check all storage volume information
Get-Volume
Output Message
DriveLetter FriendlyName FileSystemType DriveType HealthStatus OperationalStatus  SizeRemaining      Size
----------- ------------ -------------- --------- ------------ -----------------  -------------      ----
C           OS           NTFS           Fixed     Healthy      OK                     ### 285.25 GB 476.27 GB
            EFI          FAT### 32          Removable Healthy      OK                     196.91 MB 196.91 MB
F           R_FLASH      FAT### 32          Removable Warning      Full Repair Needed       7.29 GB   7.29 GB
                         FAT### 32          Fixed     Healthy      OK                      65.36 MB     96 MB
                         NTFS           Fixed     Healthy      OK                      ### 84.47 MB    566 MB
The Usb Mass Storage Device locate on F
3. Mount Drive into WSL
<usb_drive_letter>: F
create a mount directory for drive:
sudo mkdir /mnt/<usb_drive_letter>
Mount drive into WSL
sudo mount -t drvfs <usb_drive_letter>: /mnt/<usb_drive_Letter> -o uid=$(id -u $USER),gid=$(id -g $USER),metadata
-
Example: F drive
sudo mkdir /mnt/f
sudo mount -t drvfs f: /mnt/f -o uid=$(id -u $USER),gid=$(id -g $USER),metadata
4. Check disk information, mass storage device will mounted as filesystem
df
Output message:
Filesystem      ### 1K-blocks      Used Available Use% Mounted on
none              ### 2007008         4   2007004   1% /mnt/wsl
...
drvfsa            ### 7643536        64   7643472   1% /mnt/f
5. Access mass storage device
cd /mnt/<drive_of_letter>
6. Umount mass storage device, when not in use
sudo umount /mnt/<drive_of_letter>
sudo rm -rf /mnt/<drive_of_letter>
7. Check disk filesystem, the umount device is removed
df
Mount - Format USB Drive
Able make live Linux installation mediums with them. Because dedicated flash drives are plug-and-play

Terminal
1. Locate the USB Drive1
List disk block:
lsblk
Output response in raspberry pi 4B:
NAME        MAJ:MIN RM  SIZE RO TYPE MOUNTPOINT
sda           8:0    1  7.5G  0 disk
├─sda1        8:1    1  200M  0 part
└─sda2        8:2    1  7.3G  0 part /media/jun/R_FLASH
mmcblk0     179:0    0 28.9G  0 disk
├─mmcblk0p1 179:1    0  256M  0 part /boot
└─mmcblk0p2 179:2    0 28.6G  0 part /
The USB drive mount on sda/sda2
| Name | Description |
|---|---|
| /dev/sda | device name |
| /dev/sda2 | disk partition |
| /media/jun/R_FLASH | path of device mounted |
2. Unmount the USB
Unmount device to format the USB (currently locate at paration sda2):
sudo umount /dev/sda2
Check the list of block device:
lsblk
Output response:
NAME        MAJ:MIN RM  SIZE RO TYPE MOUNTPOINT
sda           8:0    1  7.5G  0 disk
├─sda1        8:1    1  200M  0 part
└─sda2        8:2    1  7.3G  0 part
mmcblk0     179:0    0 28.9G  0 disk
├─mmcblk0p1 179:1    0  256M  0 part /boot
└─mmcblk0p2 179:2    0 28.6G  0 part /
Check the list of usb device:
lsusb
Output response:
usb drive still avaialble on list
...
Bus 001 Device 003: ID 090c:1000 Silicon Motion, Inc. - Taiwan (formerly Feiya Technology Corp.) Flash Drive
...
3. Format the USB drive
Format USB drive with specific format:
format as FAT32 file system
sudo mkfs.vfat -F 32 -n 'name' /dev/sda2
4. Mount the USB drive
As drive has been unmount before format, re-mount usb drive to access it.
Create a new directory for mounting the usb drive:
mkdir /media/jun/'name'
Mount with permission access by specific user and group:
sudo mount /dev/sdb2 /media/jun/'name' -o uid=$(id -u $USER),gid=$(id -g $USER)
Powershell
1. Check Flash Drive location
Get-Volume
Output response: Flash drive mount on DriveLetter F
DriveLetter FriendlyName FileSystemType DriveType HealthStatus OperationalStatus SizeRemaining      Size
----------- ------------ -------------- --------- ------------ ----------------- -------------      ----
C           OS           NTFS           Fixed     Healthy      OK                    297.23 GB 476.27 GB
            EFI          FAT32          Removable Healthy      OK                    196.91 MB 196.91 MB
F                        NTFS           Removable Healthy      OK                      7.28 GB    7.3 GB
                         FAT32          Fixed     Healthy      OK                     65.36 MB     96 MB
                         NTFS           Fixed     Healthy      OK                     84.47 MB    566 MB
2. Format USB drive
Format-Volume -DriveLetter <drive_letter> -FileSystem NTFS -Confirm:$false
Example: format USB drive on DriveLetter f
Format USB drive locate on F:
Format-Volume -DriveLetter F -FileSystem NTFS -Confirm:$false
Output response: USB drive format to NTFS filesystem
DriveLetter FriendlyName FileSystemType DriveType HealthStatus OperationalStatus SizeRemaining   Size
----------- ------------ -------------- --------- ------------ ----------------- -------------   ----
F                        NTFS           Removable Healthy      OK                      7.28 GB 7.3 GB
-
for WSL: should mount the usb drive from window ↩
-
corresponing command: fs(5), badblocks(8), fsck(8), mkdosfs(8), mke2fs(8), mkfs.bfs(8), mkfs.ext2(8), mkfs.ext3(8), mkfs.ext4(8), mkfs.minix(8), mkfs.msdos(8), mkfs.vfat(8), mkfs.xfs(8) ↩
-
mkfs.vfat: Label can be no longer than 11 characters ↩
Mount - Create Bootable USB drive
Create a Bootable USB drive by .iso file
1. Download a distribution image
curl -Lo /tmp/ubuntu.iso https://releases.ubuntu.com/jammy/ubuntu-22.04.2-desktop-amd64.iso
2. Check USB flash location
lsblk
3. Umount USB flash Device
sudo umount /dev/sdxX
4. Convert and copy iso file to USB drive
dd if=/tmp/ubuntu.iso of=/dev/sdaxX bs=4M conv=fdatasync status=progress
5. Mount should be be denied
sudo mount /dev/sdxX Rflash/
Output response: sourcve is read-only
mount: /media/jun/Rflash: WARNING: source write-protected, mounted read-only.
Mount - Virtual Machine On Host Directory
Link the host directory to Virtual Machine
Example of UTM:
-
Setup Shared Directory in UTM setting of the virtual machine
-
Create a directory which will link to host directory
sudo mkdir /mnt/shared_directory -
Link the host directory to Virtual machine
sudo mount -t 9p -o trans=virtio share /mnt/shared_directory -
Enter directory and the mounted directory will link to host directory
cd /mnt/shared_directory && ls -al -
Unmount the host directory after used
unmount /mnt/shared_directory
Wifi Connection
[[TOC]]
Network Manager
-
Check Network Manager is running, Status:
Active: active (running) since ...sudo systemctl status NetworkManager -
Start the Network Manager if
Active: inactive (dead)sudo systemctl start NetworkManager -
Enable NetworkManager service to start automatically at boot time.
sudo systemctl enable NetworkManager
WIFI connection
List connection
nmcli device wifi list
Connect to Network
sudo nmcli device wifi connect <SSID> password <password>
XXD
Make binary as a hexdump or do the reverse hexdump to binary.
graph LR
    A[.bin] --> B[.txt / hexdump]
    B --> A
Benefits:
- Without extra external tools, you can convert binary to hexdump and vice versa.
- Convert to hexdump easy to modify and convert back to binary.
- Text is easy to search and replace by command line, which is easier for automation.
XXD - Usage
Convert binary
Binary to hex dump
xxd <binary_file> > <hexdump_file>
ex: xxd test.bin test.txt
00000000: 9751 8000 9381 81e5 9702 0000 9382 c208  .Q..............
00000010: 7390 5230 7350 4030 d1ad 0000 0000 0000  s.R0sP@0........
Binary to binary digit dump
xxd -b <binary_file> > <binary_digit_dump_file>
ex: xxd -b test.bin test.hex
00000000: 10010111 01010001 10000000 00000000 10010011 10000001  .Q....
00000006: 10000001 11100101 10010111 00000010 00000000 00000000  ......
For more readable, you can use -c option to set the number of bytes per line.
xxd -c <number_of_bytes> <binary_file> > <hexdump_file>
ex: xxd -c 4 test.bin test.txt
00000000: 10010111 01010001 10000000 00000000  .Q..
00000004: 10010011 10000001 10000001 11100101  ....
00000008: 10010111 00000010 00000000 00000000  ....
Revert to binary
Hexdump to binary
xxd -r <hexdump_file> > <binary_file>
ex: xxd -r test.txt test.bin
Modify hexdump
1. Convery binary to hexdump
xxd <binary_file> > <hexdump_file>
ex: <hexdump_file>
00000000: 9751 8000 9381 81e5 9702 0000 9382 c208  .Q..............
00000010: 7390 5230 7350 4030 d1ad 0000 0000 0000  s.R0sP@0........
2. Modify hexdump
Modify the hexdump file using any text editor or command line. Able to leave the ASCII part as unchanged even modified the hex part.
ex: sed -i 's/9751/1234/g' <hexdump_file>
00000000: 1234 8000 9381 81e5 9702 0000 9382 c208  .Q..............
00000010: 7390 5230 7350 4030 d1ad 0000 0000 0000  s.R0sP@0........
3. Convert back to binary
xxd -r <hexdump_file> > <binary_file>
Cherry-pick binary
For some binary file, we may drop some part of the binary file and keep the rest.
1. Convery binary to hexdump
xxd <binary_file> > <hexdump_file>
ex: <hexdump_file>
00000000: 9751 8000 9381 81e5 9702 0000 9382 c208  .Q..............
00000010: 7390 5230 7350 4030 d1ad 0000 0000 0000  s.R0sP@0........
00000020: 0000 0000 0000 0000 0000 0000 0000 0000  ................
2. Remove the part you want to drop
ex: sed -i '1d' <hexdump_file>
Remove second line from the hexdump file with 16 bytes or offset 0x00.
00000010: 7390 5230 7350 4030 d1ad 0000 0000 0000  s.R0sP@0........
00000020: 0000 0000 0000 0000 0000 0000 0000 0000  ................
3. Convert back to binary
Since we removed 16 bytes from the hexdump file, the binary file expected will be 16 bytes shorter.
-
if we revert the hexdump file to binary directly, we will found the removed second line is padding with 0x00 on offset 0x10.
ex:
xxd -r <hexdump_file> > <binary_file> && xxd <binary_file> > <hexdump_file>00000000: 0000 0000 0000 0000 0000 0000 0000 0000 ................ 00000010: 7390 5230 7350 4030 d1ad 0000 0000 0000 s.R0sP@0........ 00000020: 0000 0000 0000 0000 0000 0000 0000 0000 ................
Suppress leading bytes of offset 0x10 to 0x00
xxd -r -s -<suppress_bytes> <hexdump_file> > <binary_file>
ex: xxd -r -s -0x10 test.txt test.bin
00000000: 7390 5230 7350 4030 d1ad 0000 0000 0000  s.R0sP@0........
00000010: 0000 0000 0000 0000 0000 0000 0000 0000  ................
Other
-
The PiCar-X is an AI-driven self-driving robot car for the Raspberry Pi platform, upon which the Raspberry Pi acts as the control center.
PiCar-X
Topic
Introduction
The PiCar-X is an AI-driven self-driving robot car for the Raspberry Pi platform, upon which the Raspberry Pi acts as the control center.
The PiCar-X’s 2-axis camera module, ultrasonic module, and line tracking modules can provide the functions of color/face/traffic-signs detection, automatic obstacle avoidance, automatic line tracking, etc.

Installation
Topic
Introduction
Newest version of raspberry-pi should process in python environment
-
python3 -m venv venv source venv/bin/activate -
Raspberry pi - create python virtual env
before create python virtual env as link above, should enter python env first as How to enter python env example
Install All the Modules(Important)
Install:
sudo apt update
sudo apt upgrade -y
# for Lite version OS.
sudo apt install git python3-pip python3-setuptools python3-smbus
Newest version of raspberyy-pi should enter environment:
python3 -m venv venv
source venv/bin/activate
Install root-har:
cd ~/
git clone -b v2.0 https://github.com/sunfounder/robot-hat.git
cd robot-hat
sudo python3 setup.py install
Then download and install the vilib module:
cd ~/
git clone -b picamera2 https://github.com/sunfounder/vilib.git
cd vilib
sudo python3 install.py
Download and install the picar-x module.
cd ~/
git clone -b v2.0 https://github.com/sunfounder/picar-x.git
cd picar-x
sudo python3 setup.py install
Run the script i2samp.sh to install the components required by the i2s amplifier, otherwise the picar-x will have no sound.
cd ~/picar-x
sudo bash i2samp.sh
Enable I2C Interface(Important)
Enter raspberry pi configuration:
sudo raspi-config
Choose Interfacing Options:
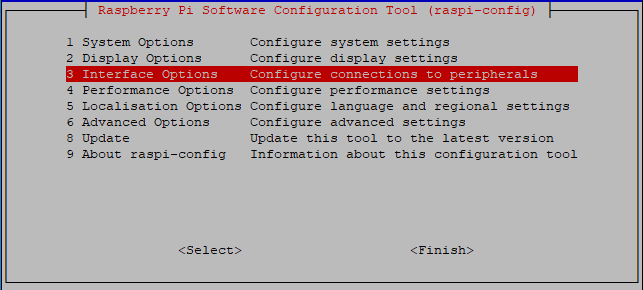
Select I2C:
-
Select
<Yes> -
Select
<Finish> -
Reboot

Servo Control
- Callibrate
- Move
- Keyboard
- Text speech
- Obstacle
- Line tracking
- Cliff detection
- Computer vision
- Stare at you
- Records video
- Bull fight
- Video car
- Treasure Hunt
- Controlled by the app